Ticketing Systems – Using ServiceNow
One of the most vital tools necessary to run a seamless, supportive and successful IT department is a proper ticketing system. Without one, there would be complete chaos. Issues would be reported through scattered emails, phone calls and hallway conversations with no central tracking. There also would be no paper trails, no priority management and incidents would slip through the cracks the moment a new issue came up.
With a proper ticketing system, everything is tracked and orderly. No chaos. Users submit a ticket, IT sees it immediately, and nothing gets lost. Technicians can classify and prioritize issues so critical problems get handled first. Everything is documented – who reported it, when, what was done and how it was resolved. If the same issue arises in the future, there is documentation from the prior case to resolve it even quicker this time around. No chaos. No forgetting. Everyone is happy.
There are countless ticketing systems out there but the one we’ll be focusing on today is ServiceNow which is arguably the most widely used ITSM (IT Service Management) platform in IT departments today. Jira and Zendesk are other ticketing systems that are quite popular.
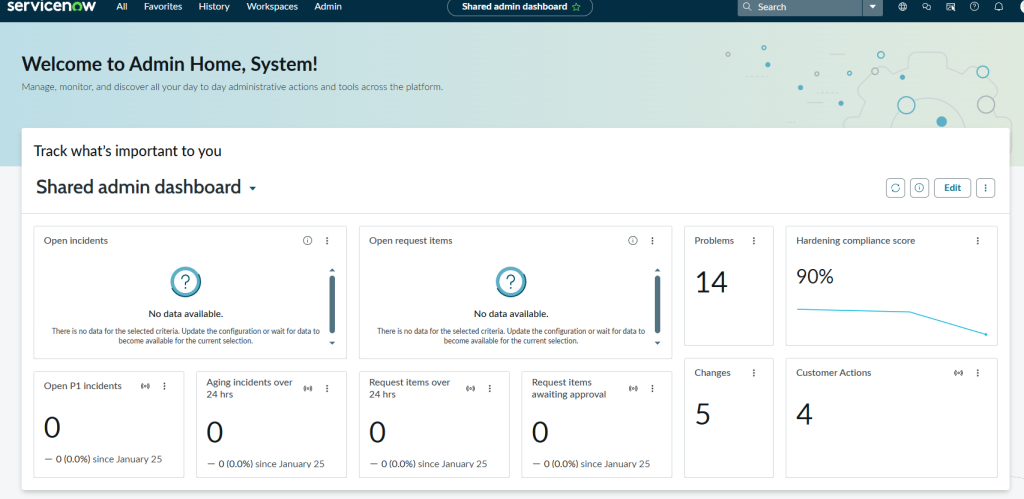
This is the dashboard you would typically encounter using ServiceNow. The great thing about it is that it’s completely customizable; you can choose which specific alerts, metrics and widgets you’d want displayed that is relevant to your role. I’ll edit this dashboard later in this blog.
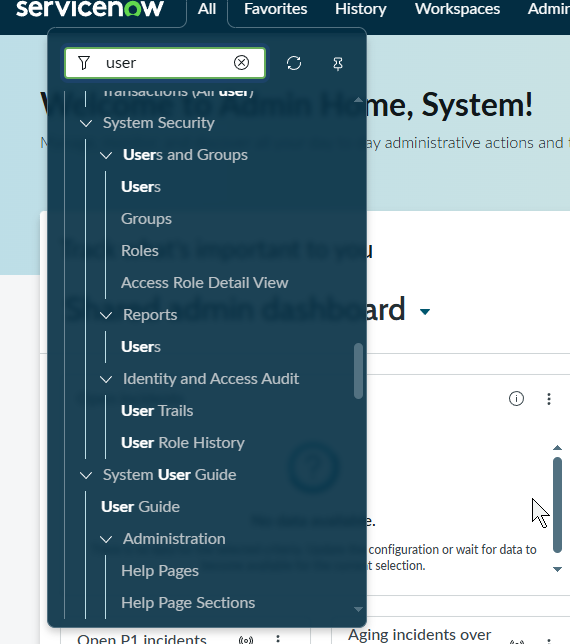
ServiceNow is a massive platform with many modules, settings and configuration options (I am talking in the literal hundreds of options). You need to master the ‘Filter Navigator’ to navigate this platform effectively, which is located in the top left corner. This is how you get anywhere in ServiceNow.
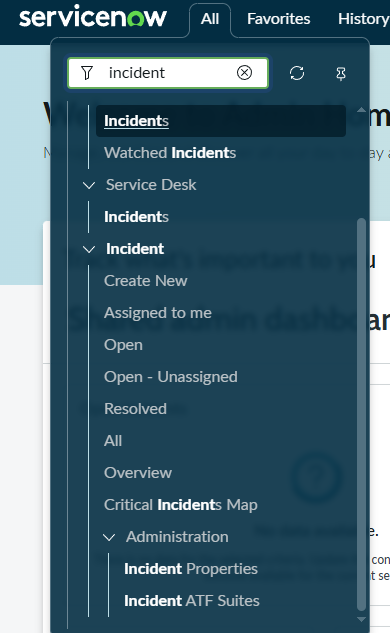
In the images above I filtered for ‘users’ and ‘incidents’. Look at all the different options that appear with just one term which brings me to an important concept: everything in ServiceNow – and I truly mean everything – exists in its own unique module. Viewing the list of users is in a completely different location than creating a new use, which is separate from managing user roles and so on. The same applies to incidents and any other variable you can think of. Once you learn the Filter Navigator, you can find anything in seconds.
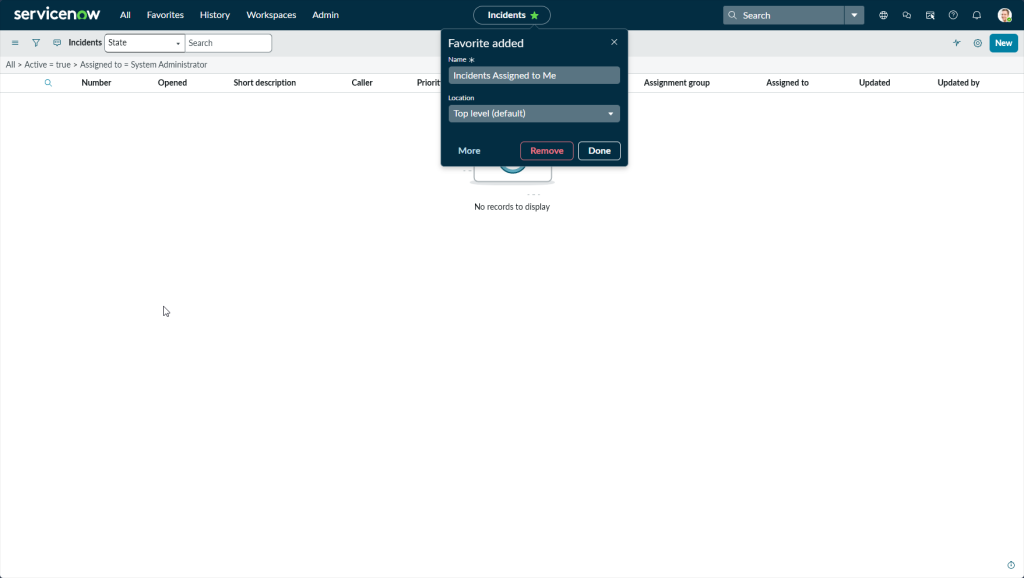
Since there are so many modules to navigate and time is of the essence, you can favorite the ones you know you will use frequently. In the top left next to the ‘All’ option, you’ll find your list of favorited modules for even quicker access.
But even faster is customizing your dashboard to display the metrics and data you care about most, as mentioned earlier.
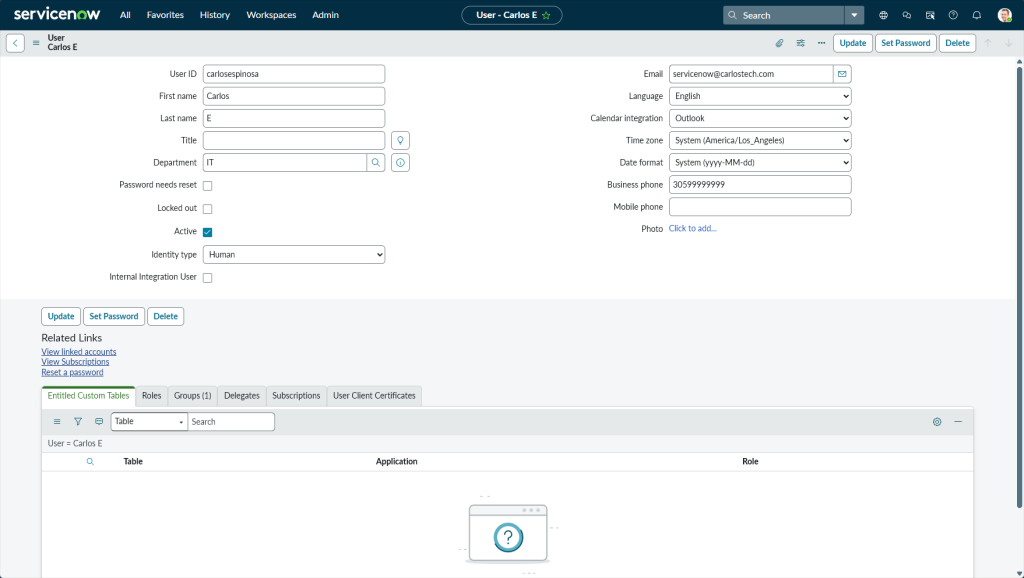

I created myself as a user so tickets can be assigned to me as shown in the two images above. An important note: you must create a ‘User ID’ (first option shown above when creating a user) or ServiceNow will have difficulty locating the user profile in other modules even if every other field was filled in. I learned this the hard way when my user’s wasn’t appearing in assignment lookups until I went back and added a User ID.

Note: In a real environment, you’d rarely create user profiles manually within ServiceNow. Instead, you would use LDAP integration to sync automatically with your Active Directory server(s).
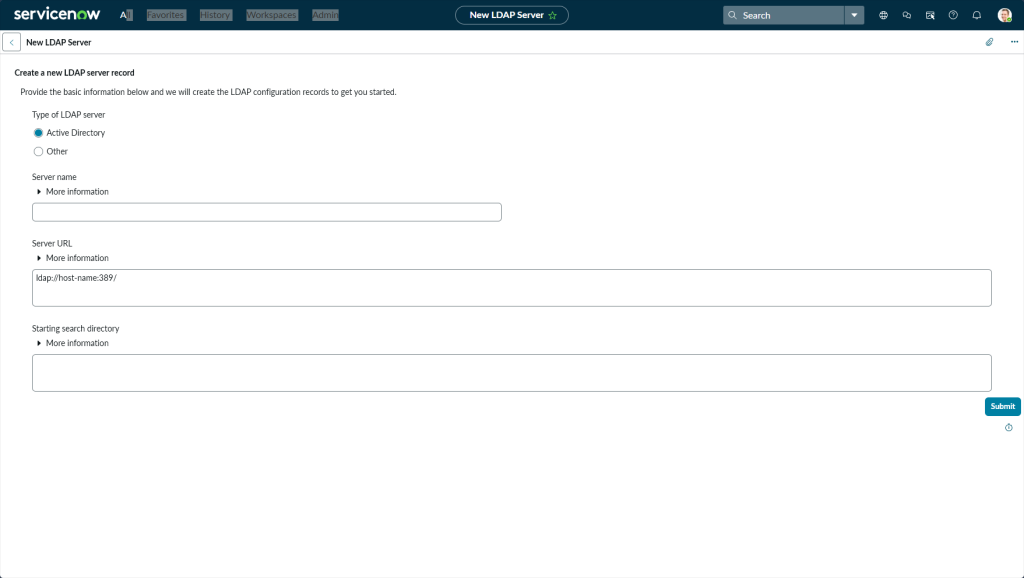
In the two images above, you can see where this is configured. You input the AD server’s hostname and IP address using either port 389 (LDAP) or 636 (LDAPS for secure connections). ServiceNow asks for the Server URL so you input it as “ldap://192.168.1.100:389/”, you cannot input a bare IP address. The login distinguished name and login password in the second image are the credentials for a service account you’d create directly on the AD server (remember our previous AD labs). ServiceNow uses this account to authenticate and sync with AD. Do not forget to follow the principle of least privilege – this account should only have read permissions so it can query user attributes. Lastly, ensure your firewall allows traffic on whichever port you’re using for the connection.
Notice how the configuration asks for a hostname and/or IP address but ServiceNow operates in the cloud. So how does it reach your on-prem AD servers that are within a private network?
My networking curiosity got the better of me and I did some digging. A common approach that companies use is by utilizing a MID server that ServiceNow provides. The MID server sits within your network and helps bridge the gap between ServiceNow’s cloud and your internal network. However, this MID server initiates outbound connections only which means that your AD servers are never exposed to the internet. This is great security practice. Other options include utilizing a VPN tunnel between your network and ServiceNow or using Azure AD instead of on-prem AD.
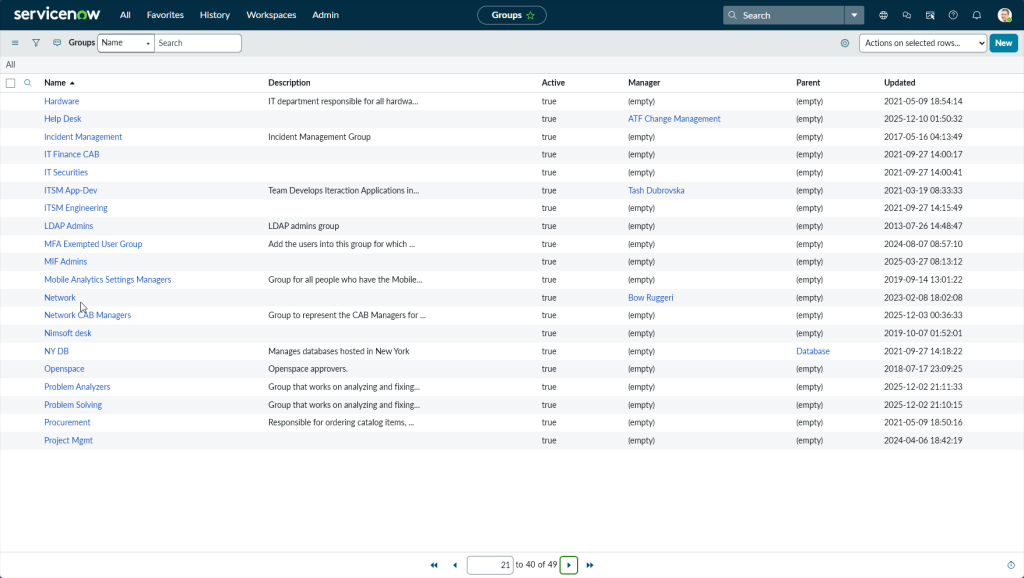
Now that we’ve created my user profile, the next step is to create an assignment group. In the image above, you can see all the different groups that can exist depending on the size and structure of your organization – Help Desk, the Network team, a team that only works with Databases in New York and so on.
When a ticket is created, it gets assigned to a specific group based on the incident type. A password reset might go to Help Desk, while a server issue goes to the Network team. To create a new group, click the “New” button in the top right.
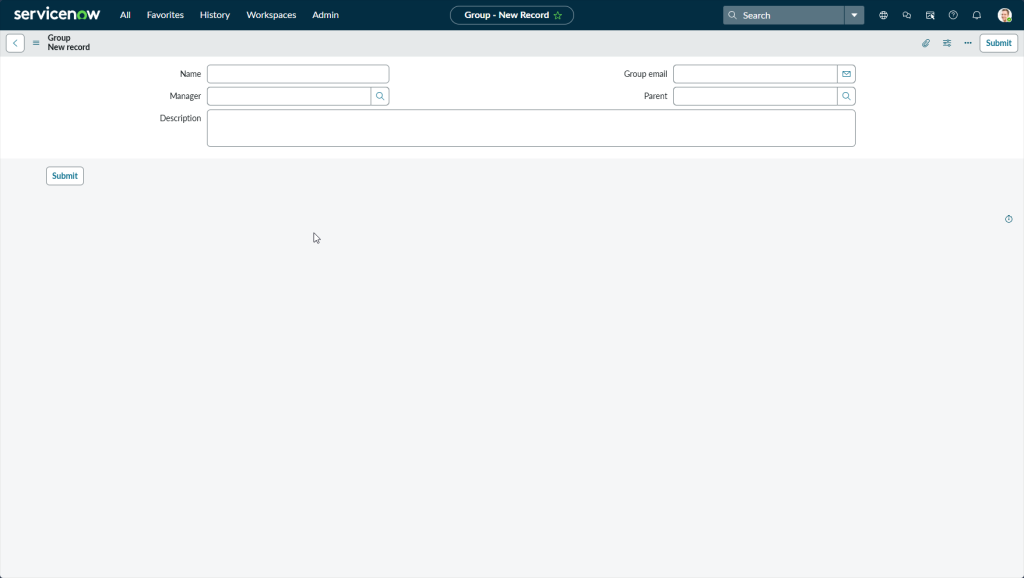
This is what the group creation form looks like. You can assign a manager, add a description, set a group email and more. Everything is documented and centralized.
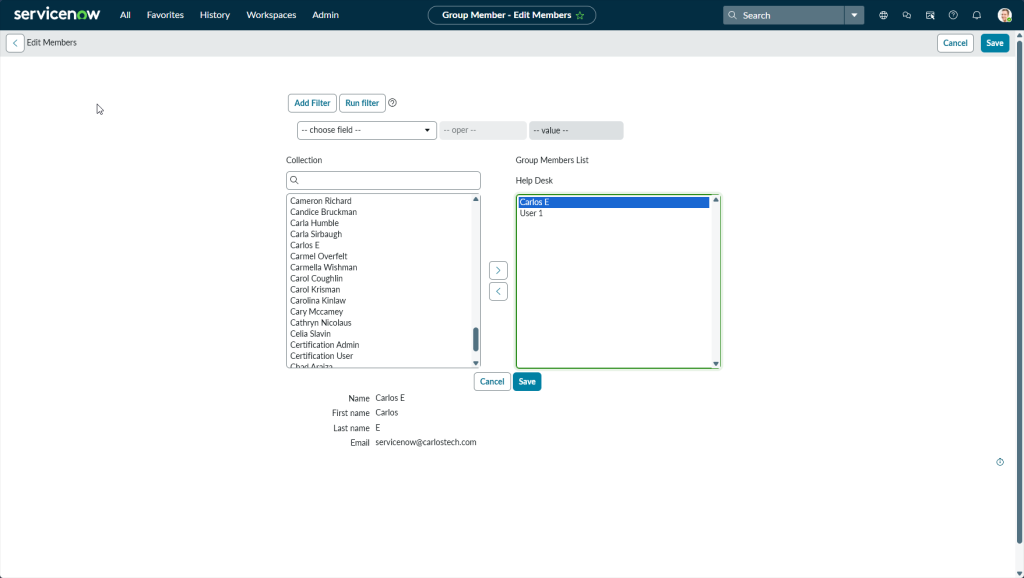
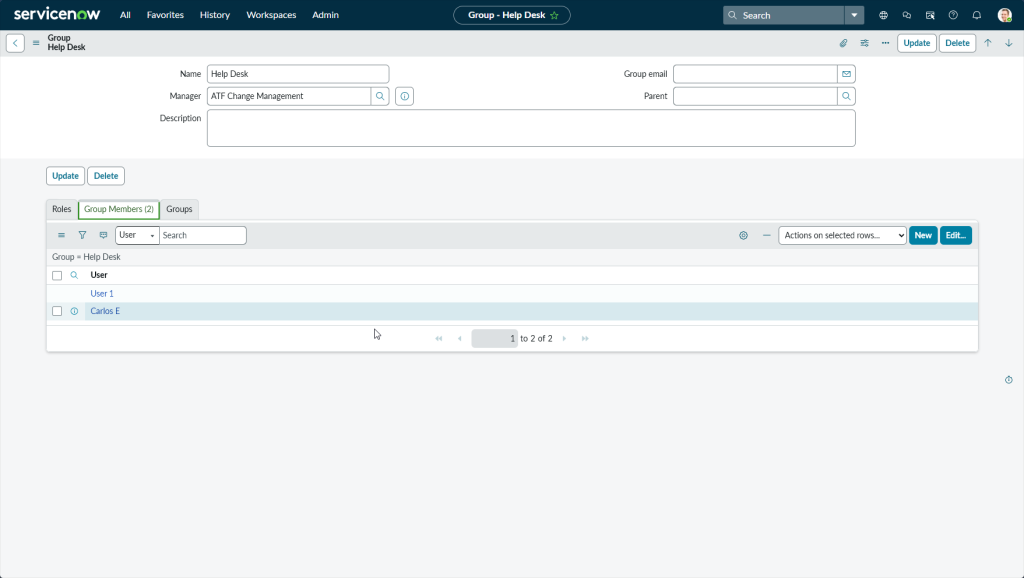
Remember to add users to the group. In the image above, I added myself to the Help Desk group.
Here’s what editing a group looks like in the image above.
In many organizations, users can submit tickets directly through a self-service portal, or they can contact the IT department via phone, email, or even as a walk-in, and the IT department creates the ticket for them.
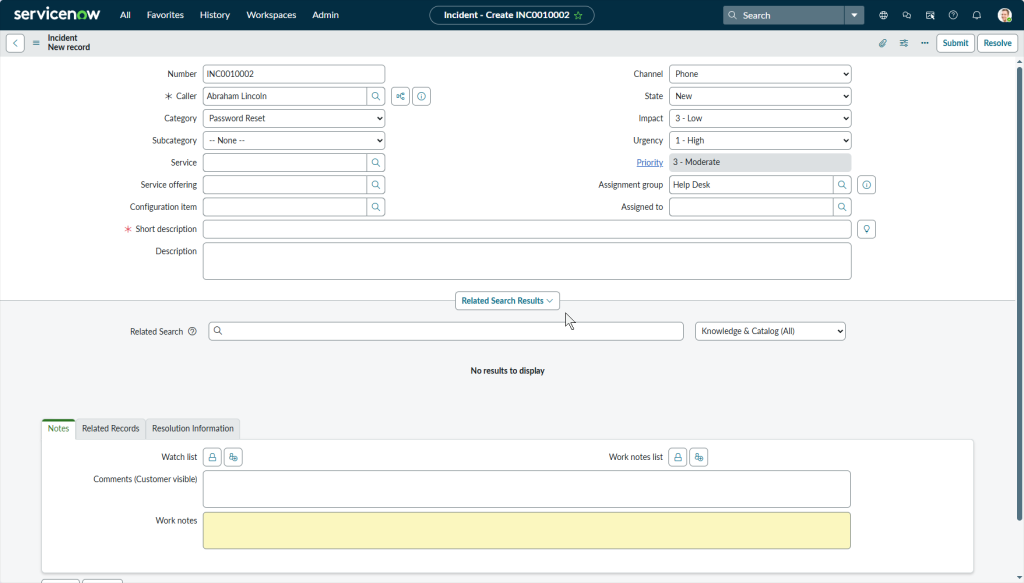
The image above shows the latter. Abraham Lincoln called the IT department and I, as the IT technician, am creating a ticket for him requesting a password reset. Notice all the different fields available – caller, category, priority, assignment group and more.

After some digging, I discovered that only users with the ITIL’ role (or higher) can be assigned tickets! I was logged into the default admin account that ServiceNow provides, and when I tried to assign a ticket to my Carlos user, I couldn’t find it in the lookup – even though I had clearly created the profile earlier. Without the ITIL role, ServiceNow did not recognize me as a ‘fulfiller’ who can work tickets. This was an important lesson!
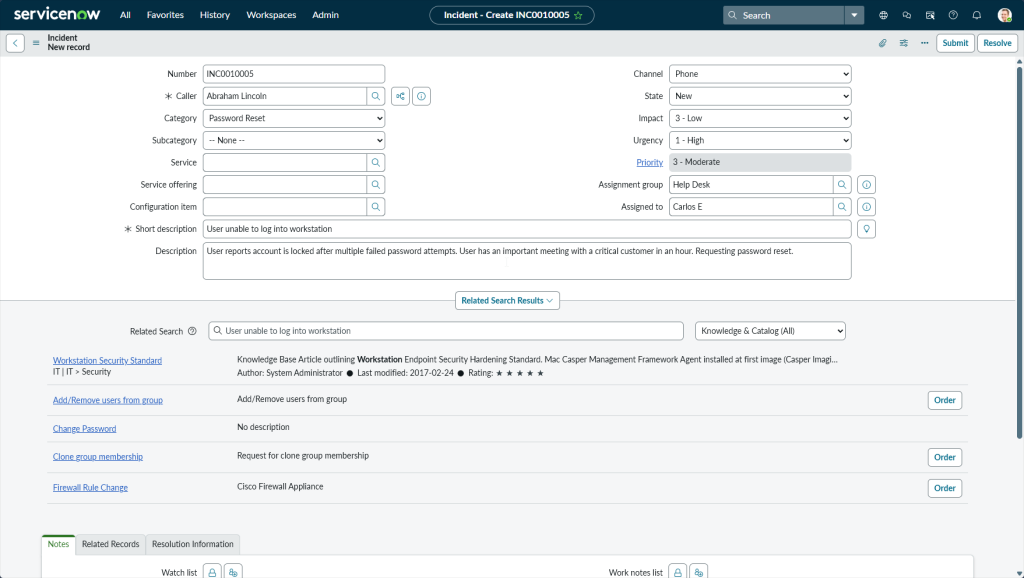
The image above shows the completed ticket. You can see the ticket number in the top left, the caller who reported the issue (Password Reset), and the channel through which the user contacted IT (phone) on the right column.
An extremely important component of any ticket is its “State“. Since Abraham just called us to submit this request, the state is “New”. Tickets will stay in the “new” state until someone assigns it or picks it up from the queue. If a ticket is assigned to someone, the state may auto-change to “In Progress“. However, if a tech grabs a ticket directly from the queue, they’ll need to manually change the state to “In Progress” to indicate that they’re actively working on it. They can also change the state to “On Hold” if they are waiting for a part to arrive, awaiting the user’s response or a different scenario that does not allow them to actively work on the ticket. Once the issue is fixed, the state is moved to “Resolved”, but it stays in the system as an open record for a waiting period. This gives the user a chance to reopen the ticket if the problem reappears. After the waiting period elapses, the system automatically moves it to “Closed” in which the ticket is permanently locked and cannot be reopened. If the issue comes back after the ticket is in the “Closed” state, a new ticket must be created.
Equally important is setting the correct Impact and Urgency. These two fields determine a ticket’s “priority“. You do not want to mark a harmless request as urgent when more critical issues that can be affecting business continuity are waiting.
For this ticket, I set the impact to Low because this issue is affecting only one user, not the entire organization. However, if you look at the description that I put due to Abraham explaining the situation to me, notice how they have an important meeting with a crucial client within the hour. Because of this context, i set the urgency to High so the ticket will still be prioritized. This is a judgement call – different organizations may define impact and urgency differently based on their own business needs.
Extending deeper into our password reset ticket – a great feature of ServiceNow is its integration with the Knowledge Base. As you input details into the description, the system automatically suggests related articles that could solve this incident quickly. If someone has already documented how to handle this type of issue, you don’t have to
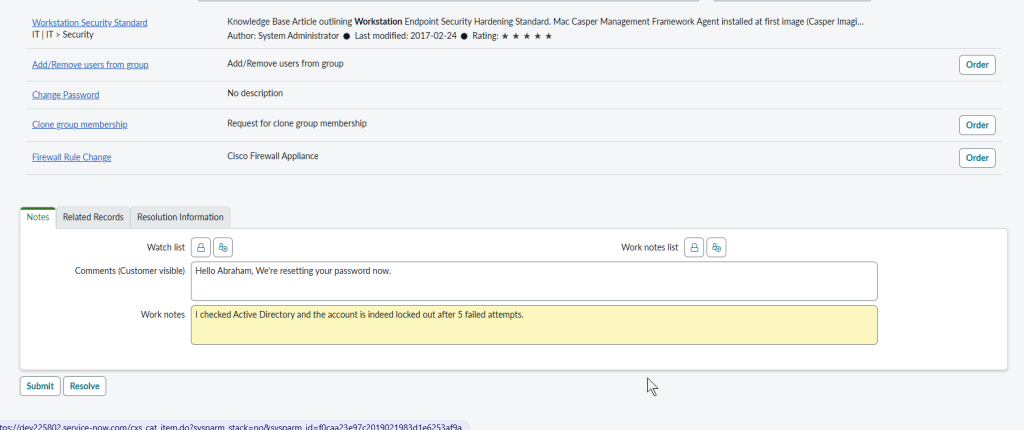
I can also write Comments, which are visible to the customer, to keep them informed on progress. There are also Work Notes, which are internal only. Here, if I have to escalate the ticket to a higher-tier technician, I can document the steps I’ve already taken, what I observed and any other relevant details so when the next person picks it up, they’re not starting from scratch.
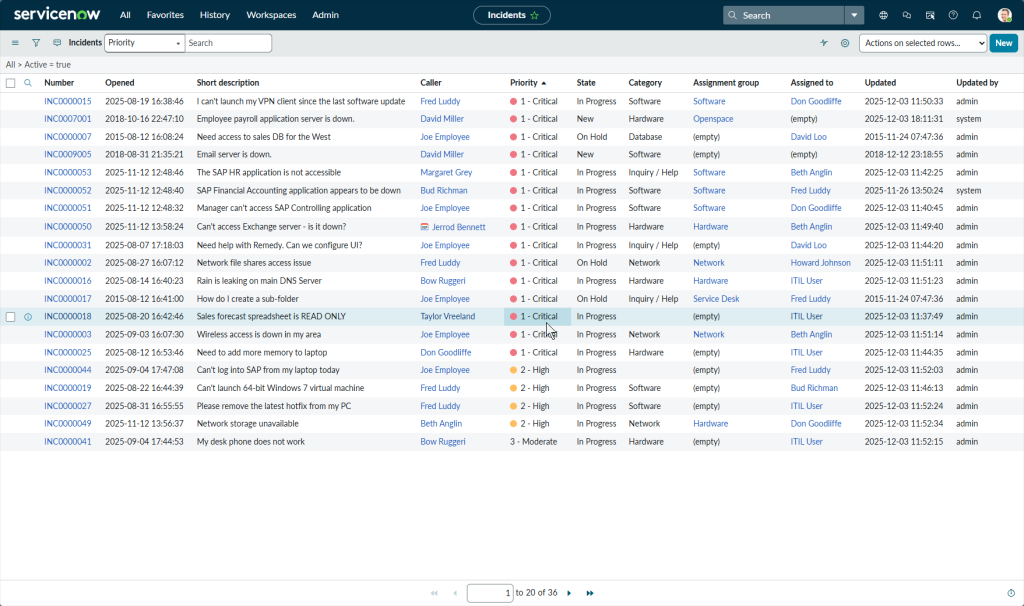
The image above shows all open incident currently in queue. This view displays the ticket number, when it was opened, a short description, the user who requested it, the priority, state, who it’s assigned to, when it was last updated and more.
Notice how different tickets are assigned to different people, groups, and categories. Everything is detailed and organized. When an application is unresponsive or giving trouble, it is assigned a ‘Software‘. If a monitor won’t turn on, it can be grouped under the ‘Hardware’ category. Depending on how many technicians a company has, each category can be assigned to specific people or teams. If someone has downtime, they can help with another category. Almost everything in this platform can be categorized in one way or another.
Proper categorization is critical because you can sort and filter this list by any of the mentioned fields. In the image above, the list is ordered by priority, so all Critical (P1) tickets appear first. This ensures the most urgent incidents are always visible at the top.
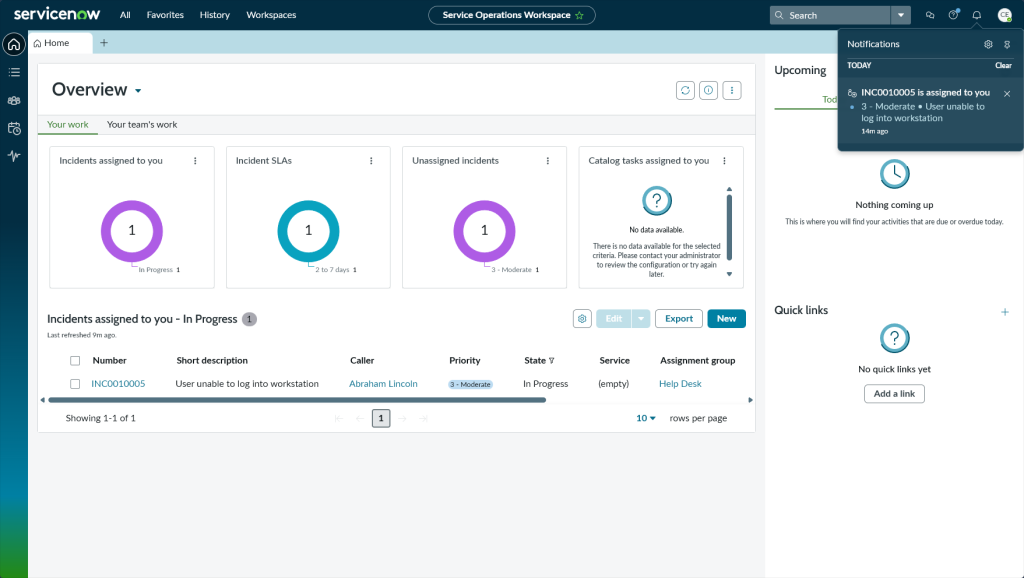
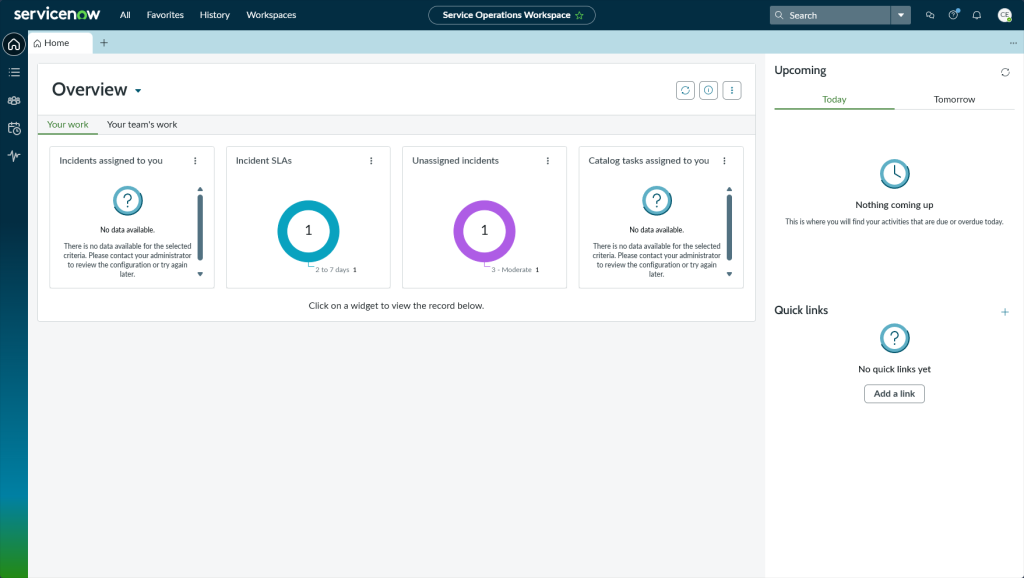
This is my first time logged in as Carlos, the user I created, and this is my dashboard. You can see the ticket we just created is now assigned to me. I opened that widget and the details appear right below. Notice how the state changed to ‘In Progress‘ immediately without any manual input – confirming what we mentioned earlier.
I can also see incident SLA metrics and unassigned incidents sitting in the queue. Notice the notification alert on the top right.
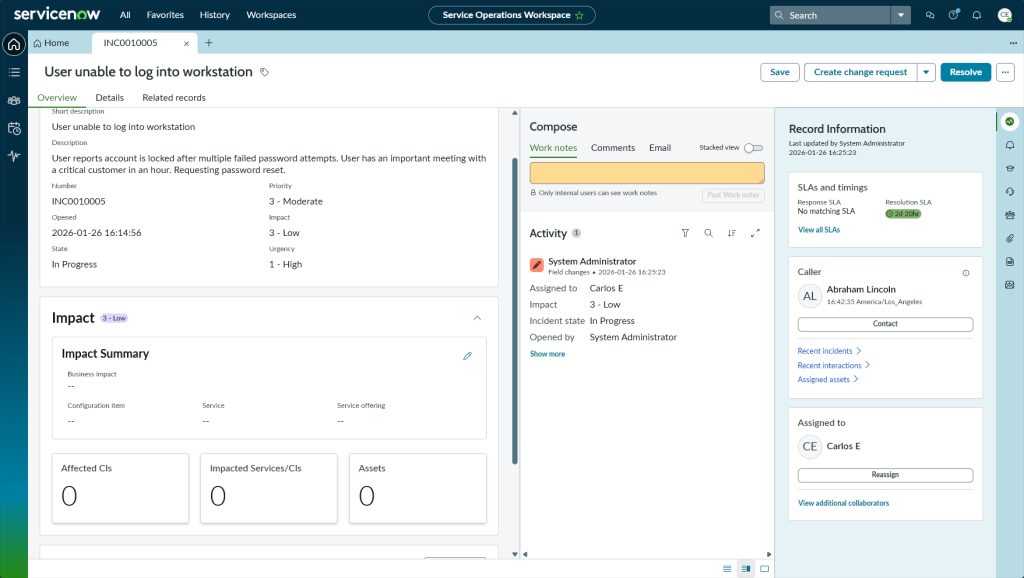
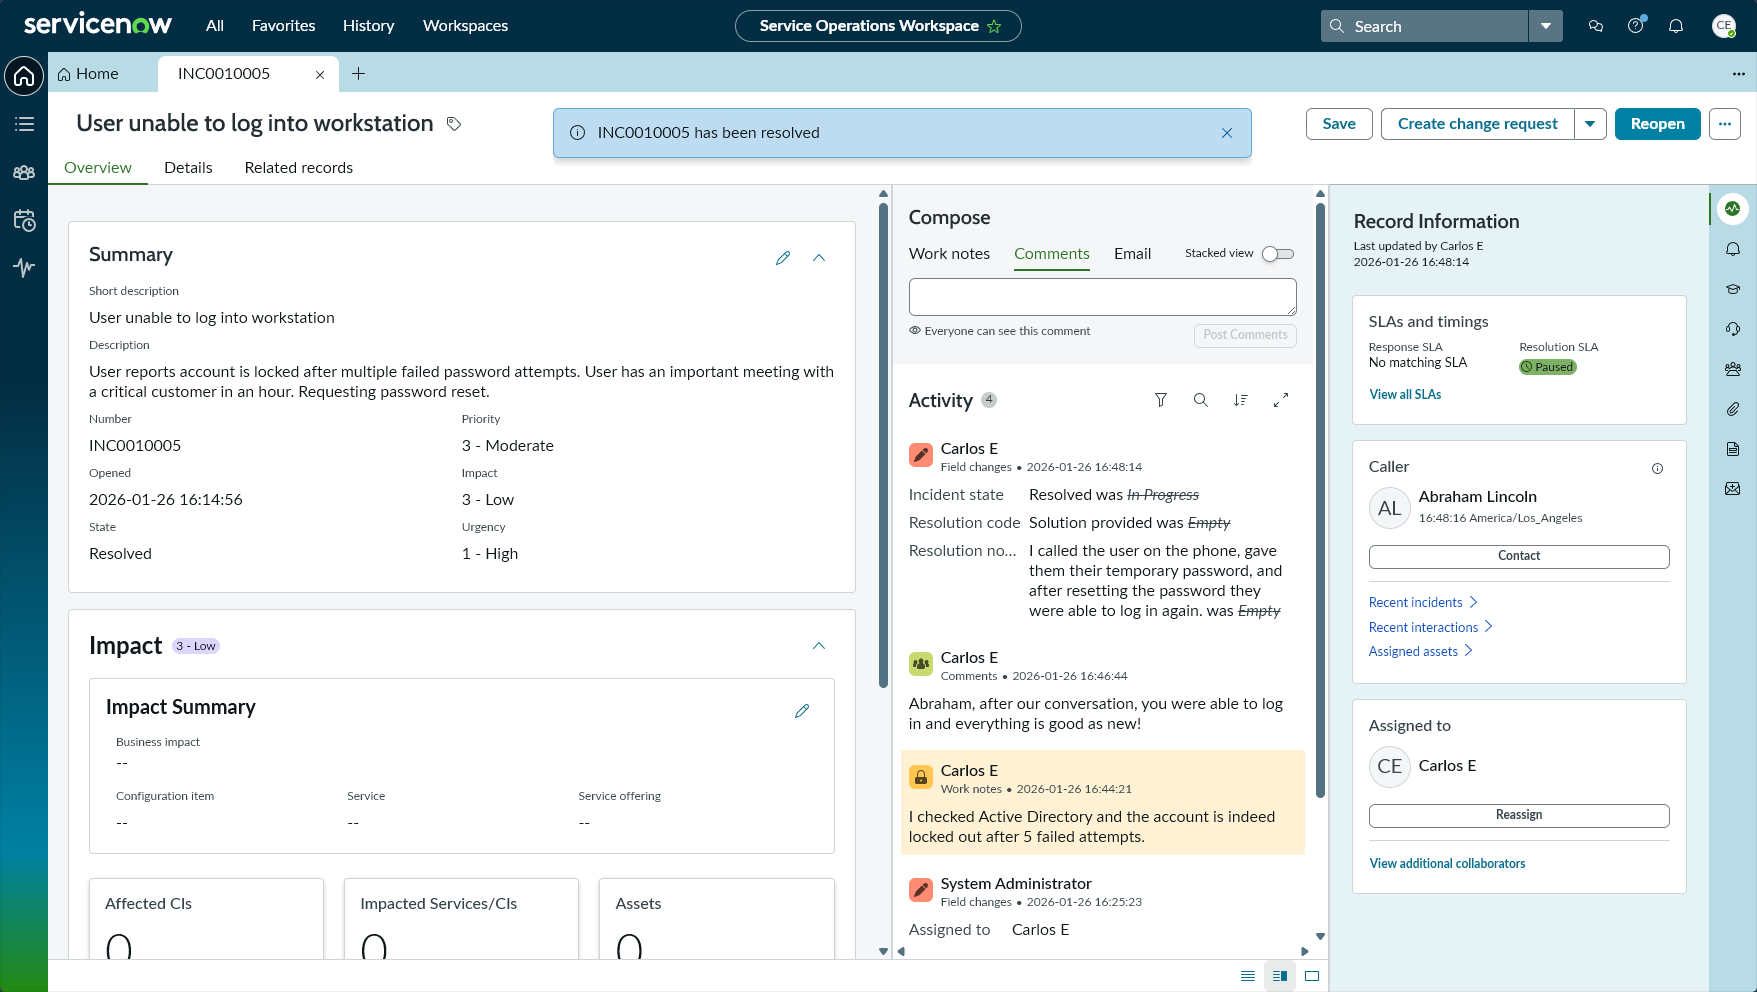
This is how the ticket looks when the assigned technician opens it. On the left, you have all the incident details. On the right, you can see SLA information showing how much time you have to respond and resolve. You can also see who assigned the ticket to you.
In the middle column under ‘Compose’, I can write work notes, which are internal only. The user who called in this incident would not be able to see it. This is strictly for the IT team to document troubleshooting steps, observations and/or notes for escalation.
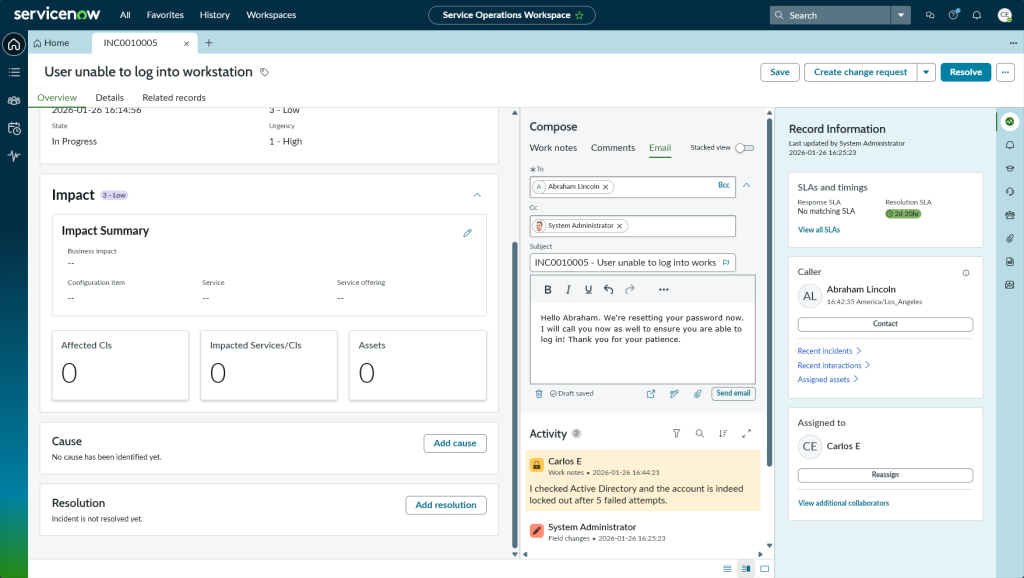
I can also send an email to the user directly from this screen, keeping all communication tied to this ticket.
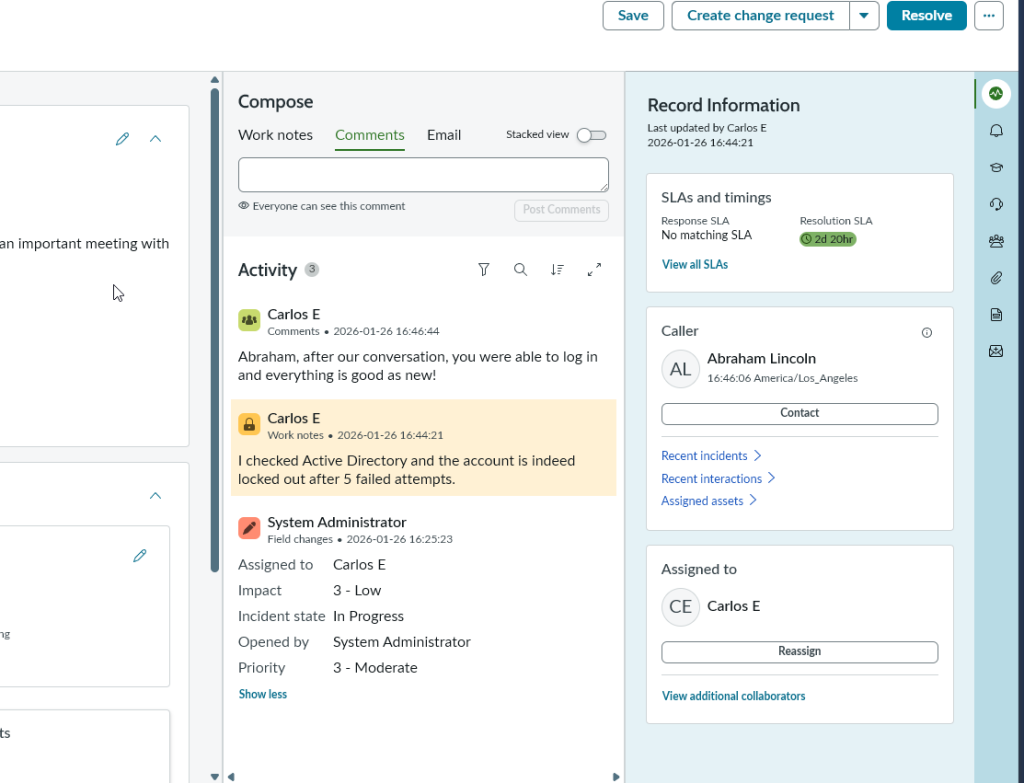
I also left a comment, which the user is able to see. Notice how the internal documentation is in yellow to distinguish them from the customer-visible comments.
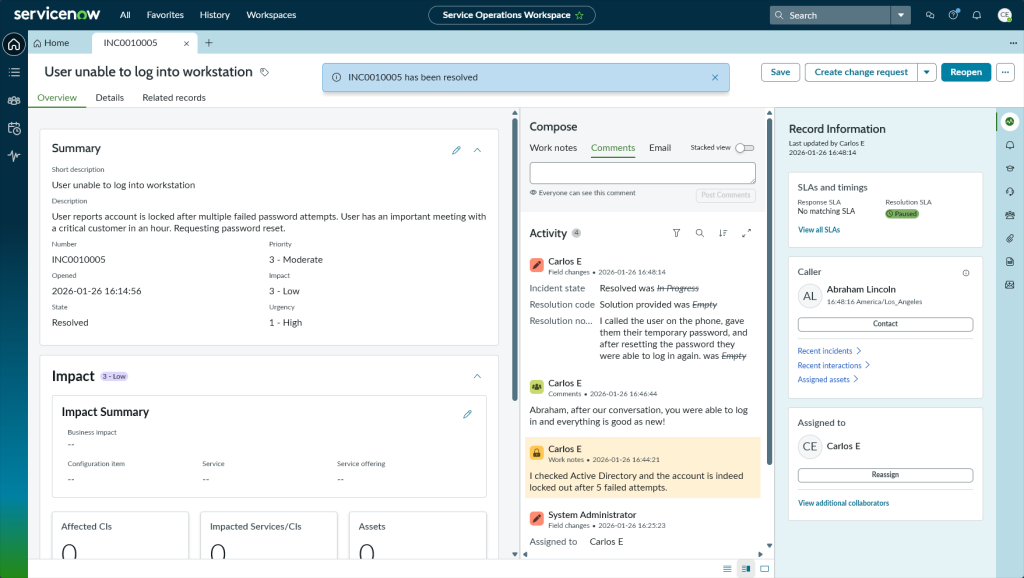
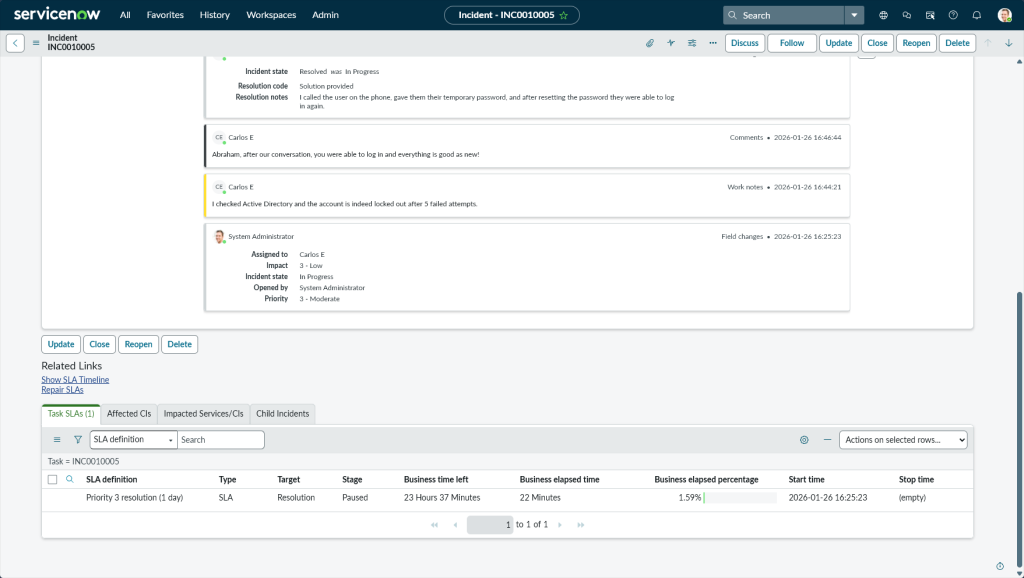
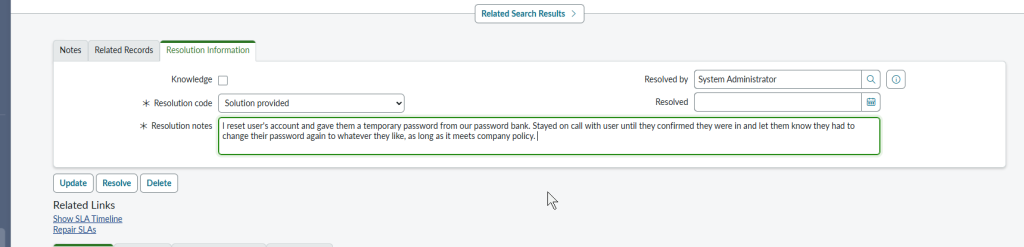
After resolving the ticket, I had to input a resolution code and a resolution note explaining how the issue was fixed. SLA is paused to the right, once a ticket goes to the “Resolved” state the timer pauses.
Note the incident is resolved in the top of the screen. If for some reason the issue persists, I can ‘reopen’ the ticket in the top right to bring it back to an active state.
Back on my dashboard, you can see the widget containing my assigned incidents is now empty, that resolved ticket is no longer in my queue. Notice we still have an unassigned ticket sitting in the queue waiting to be picked up!
Back on the admin account, when you open an incident, this is what the bottom of the ticket looks like beneath the Knowledge Based Articles. All communication history is documented here. Notice the boxes marked as “Comments” which the user, Abraham, was able to see, as well as the internal “Work Notes” box.
An extremely critical component of any ticket is the SLA – Service Level Agreement. These are commitments between the service provider (in this case, us as IT) and the customer based on response and resolution times. Remember when I set the ticket to highest urgency and lowest impact? Well, with those inputs the system calculated this incident as a Priority 3 situation. According to the SLA for Priority 3 incidents, I had to respond to the customer within 4 hours of incident creation and must have resolved the ticket within one business day. The SLA section at the bottom showcases how much time remains for each target. The ticket was handled efficiently and only 1.59% of the allowed business time elapsed, which brings me to my next point.
Even though the system assigned this as a Priority 3 incident with a full business day to resolve, I knew from the ticket details that Abraham had a critical meeting within the hour. Organizations can have a defined criteria for classifying impact and urgency (single user issue is low impact while a department-wide issue is high). SLAs are mandatory targets but as a technician, we still need to read the context and apply judgement. A single user locked out before a major meeting is not the same as a single user who cannot connect to the Wi-Fi. In hindsight, I should have set both impact and urgency to high making this a Priority 1 ticket.

As you can see on my dashboard, Abraham’s ticket now shows as “Resolved”. As mentioned earlier, resolved tickets remain visible for a waiting period in case the user needs to reopen, then the system automatically closes them and they drop off the active list.

Recall how I mentioned earlier that dashboards are fully customizable. The image above depicts what a typical helpdesk technician’s dashboard might look like: open incidents, SLA timers, unassigned tickets and more.
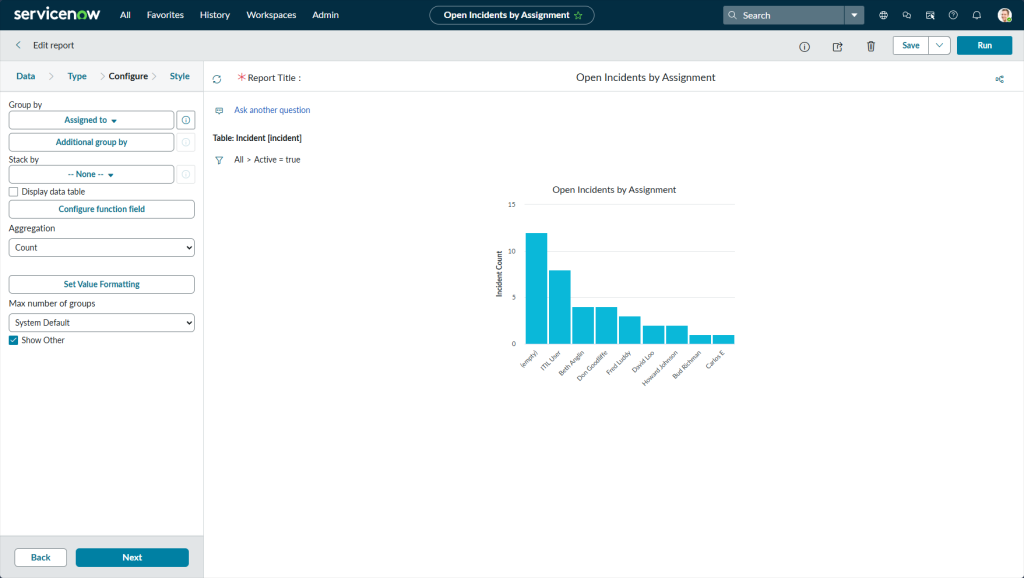
One of the most valuable features of ServiceNow is the ability to run reports on practically any data you need. In the first image above, I ran a report showing open tickets and who they were assigned to. This allows a manager to visualize ticket data for workload balancing and identifying bottlenecks. Is one tech overloaded while others have capacity? Are there too many tickets unassigned?
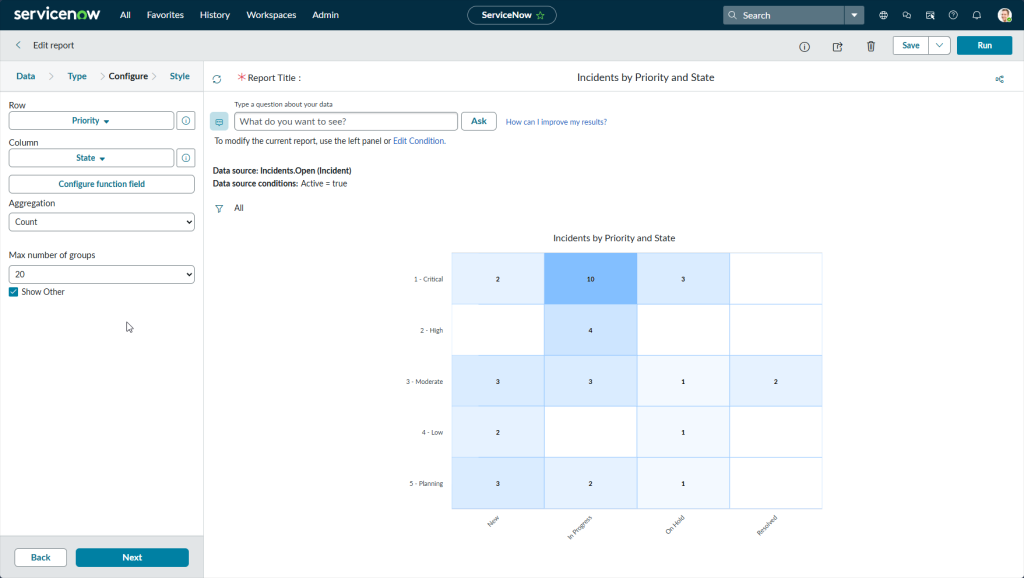
The second image is showing the state of different incidents and their priority levels. This shows a manager if the high priority tickets are being attended to promptly and not stuck in queue.
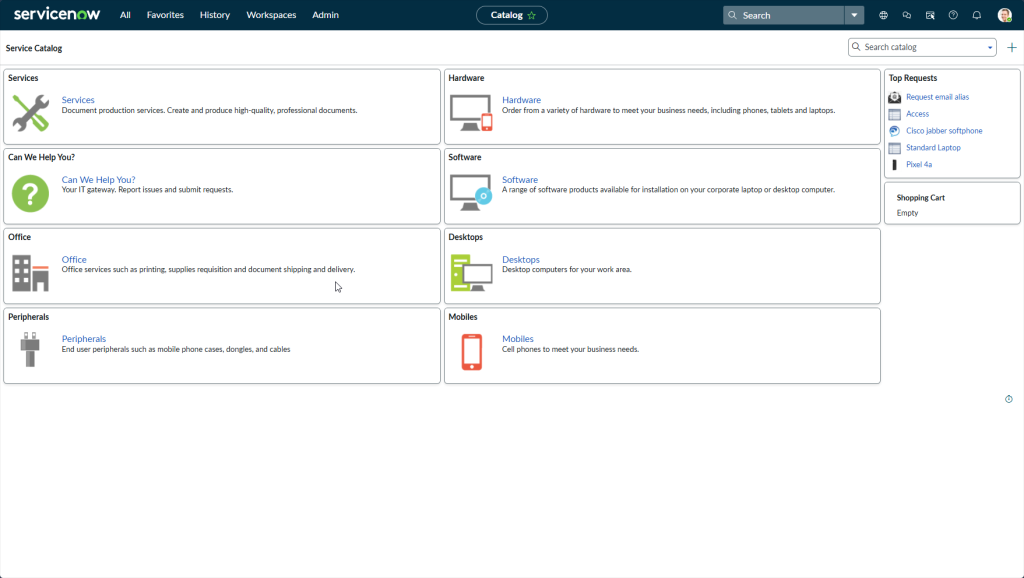
The image above shows the “Service Catalog” which is what end users see when they log into ServiceNow. There is no complicated backend or overwhelming options – just a clean and simple interface. Using this catalog, users can request new hardware (laptop, mouse, etc.), browse what software are available, or submit tickets and report incidents.
End users only see what is relevant to them. They are unable to view other people’s tickets, SLA timers, reports, or any of the backend tools that technicians have access to.
ServiceNow is a full ITSM platform that brings structure, accountability and visibility to IT operations. In this project, I explored the core functionality that a helpdesk technician would use in their day-to-day: navigating the platform, creating and resolving incidents, understanding ticket lifecycle as well as SLA management, building dashboards, running reports and more. Now that I have gotten hands-on experience with this platform, I am confident I can hit the ground running in any environment that uses it!