
Managing Cloud Identity and Endpoints with Microsoft Entra ID and Intune
Modern workloads require modern solutions. In previous projects, I built Active Directory environments across Azure and VMware – but both were traditional on-premises configurations. In this project, we are going to focus on Microsoft’s cloud identity platform instead: Entra ID (which was called Azure Active Directory before) and Intune for centralized endpoint management.
Since I’ve already documented traditional AD extensively, this project won’t deep-dive into Active Directory fundamentals. Instead, we’re going to learn and explore Entra ID and Intune. These are two tools that have become essential in modern IT environments as organizations move away from on-prem infrastructure.
One thing I noticed immediately: Entra ID is significantly easier to work with compared to an on-prem Active Directory service. There’s no DNS troubleshooting, no domain controller issues, and the settings that I need are easily searchable through the web portal. The administrative overhead is drastically reduced.
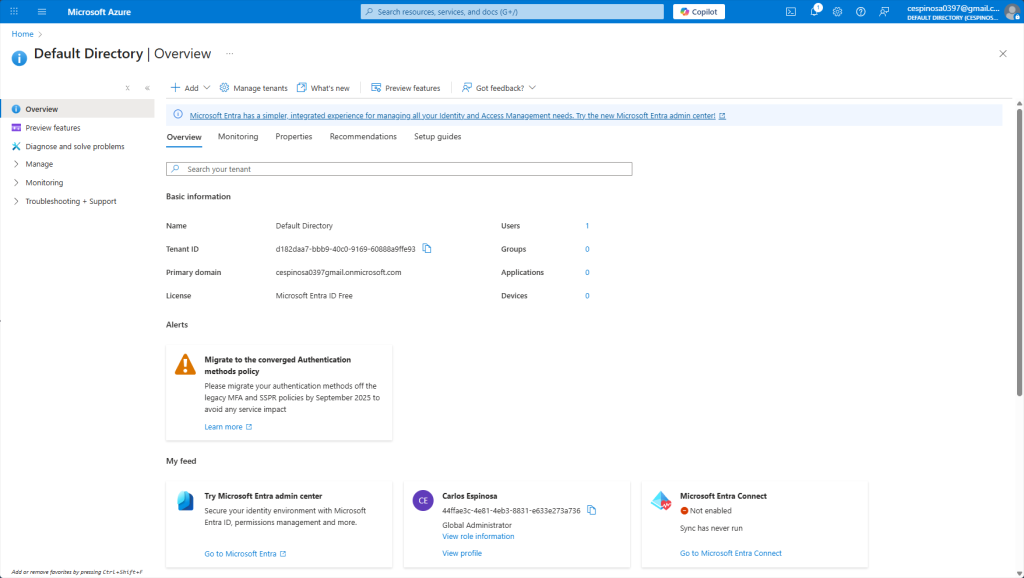
This is the Azure portal view of Entra ID, still labeled as “Default Directory” in the older interface. Some things I want to explain: Here you can see all of the users, groups, and even devices associated with this directory.
The Microsoft Entra Connect option (bottom right) enables hybrid identity – which syncs your on-premises Active Directory with Entra ID so users can authenticate to both environments using the same credentials! The ‘Add’ button (top left), allows you to create new users, groups and more just like we did in our prior AD projects except now you are managing everything through a web portal instead of tools like Active Directory Users and Computers.
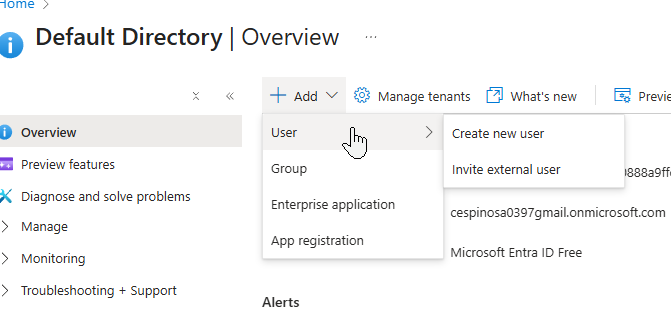
Digging deeper into that ‘Add’ button, you’ll notice you can also invite external users. In Entra ID, having the option of external users is useful for granting people outside your organization (contractors, vendors, etc.) with limited access to your tenant enabling collaboration. They authenticate through their own organization’s identity provider.
There are banners throughout the interface prompting me to try out the Microsoft Entra admin center. Let’s switch over to that modern portal and continue from there.
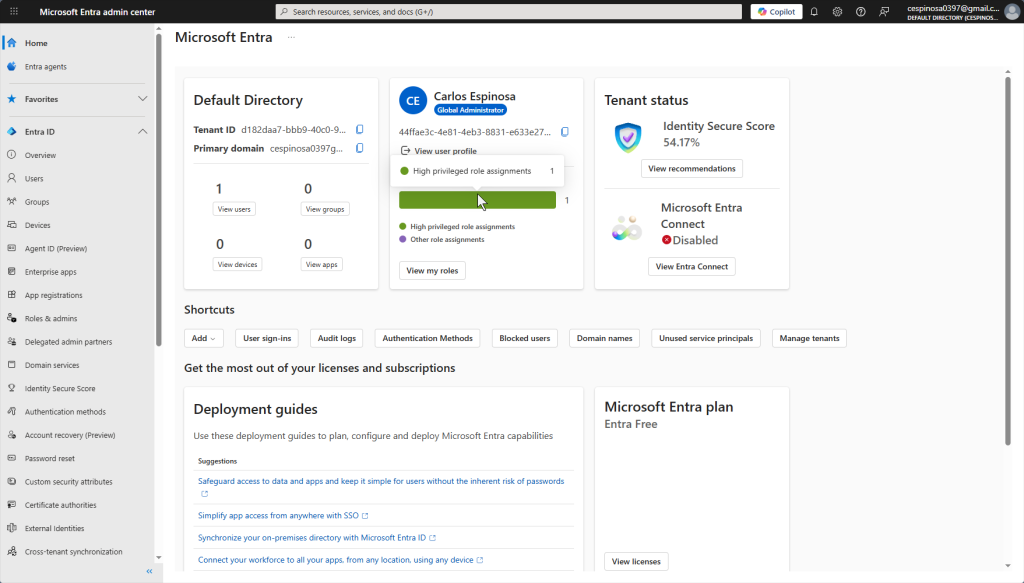
The image above shows the modern Microsoft Entra admin center. Notice how much cleaner and more organized the interface is where options that were previously buried within miscellaneous links are now in the front. Users, Groups, Devices, and even Applications are all accessible from the streamlined sidebar.
This is essential for enterprise environments as Entra ID is the identity foundation of Microsoft 365. When you create a user here in Entra ID, that identity is used through the entire M365 ecosystem – whether its Teams, Sharepoint or something else.
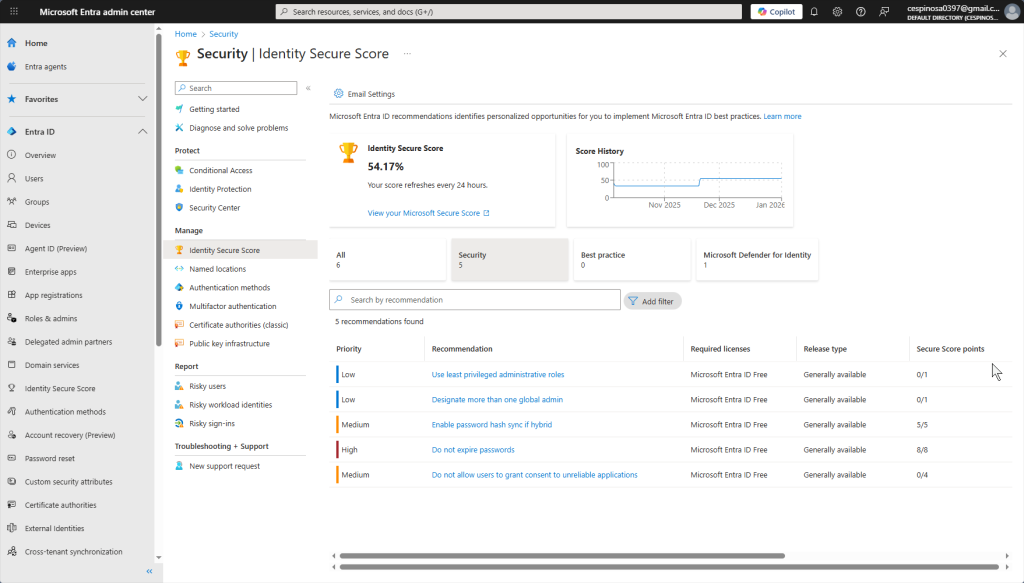
The Identity Secure Score provides recommendations and insights to strengthen your tenant’s (equivalent to the ‘forest’ in previous AD labs) security posture. Azure analyzes what your current configuration looks like and suggests improvements such as enabling MFA or configuring Conditional Access policies.
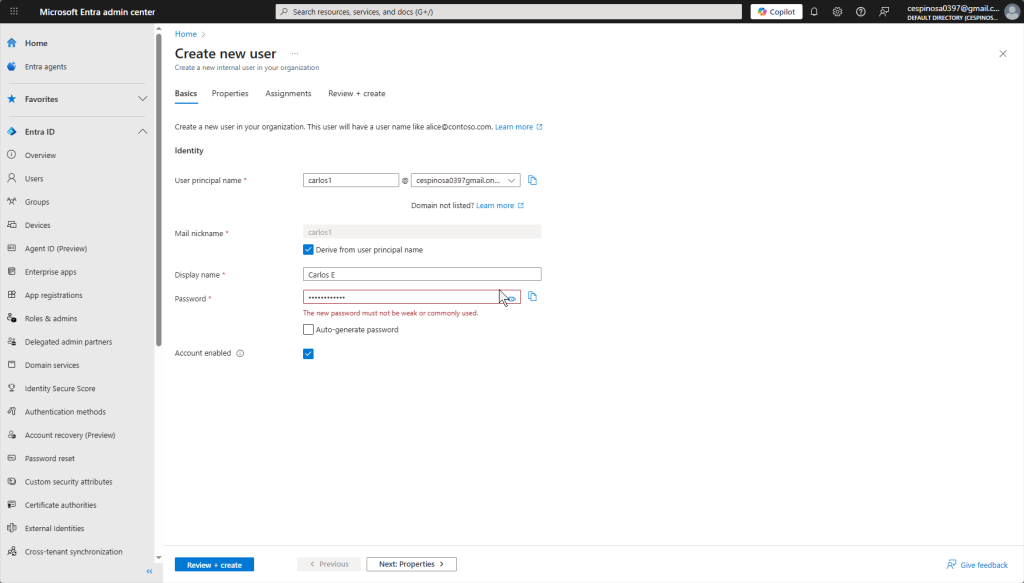
When creating a new user, notice that Azure does not allow you to create a weak password. Security is enforced by default at every step. In our on-prem AD environment, I had to create a Group Policy Object to specifically enforce password complexity. It’s already built in with Entra ID!
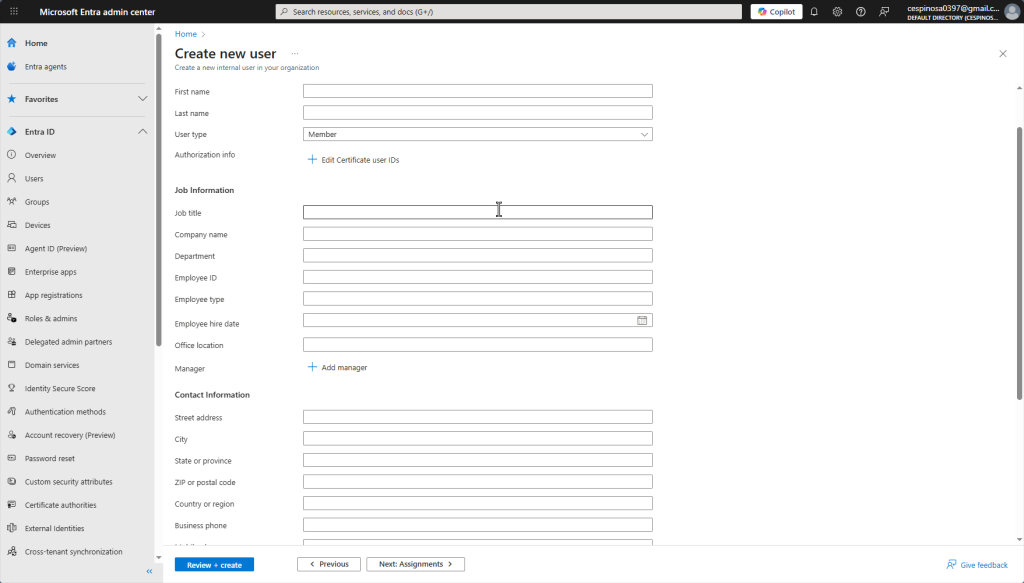
The Properties tab lets you configure the user’s full name, account type, contact information, and more. Note: most enterprises would probably automate this process using PowerShell or they would bulk-create users by uploading or using Microsoft’s CSV file that you download. In the CSV file, you still do manually enter the users’ information but you do not have to go through Azure’s forms for each patient repeatedly.
Other options include using the Entra Connect mentioned earlier to sync existing on-prem AD users to Azure, or integrations with other software that can auto-populate these fields.
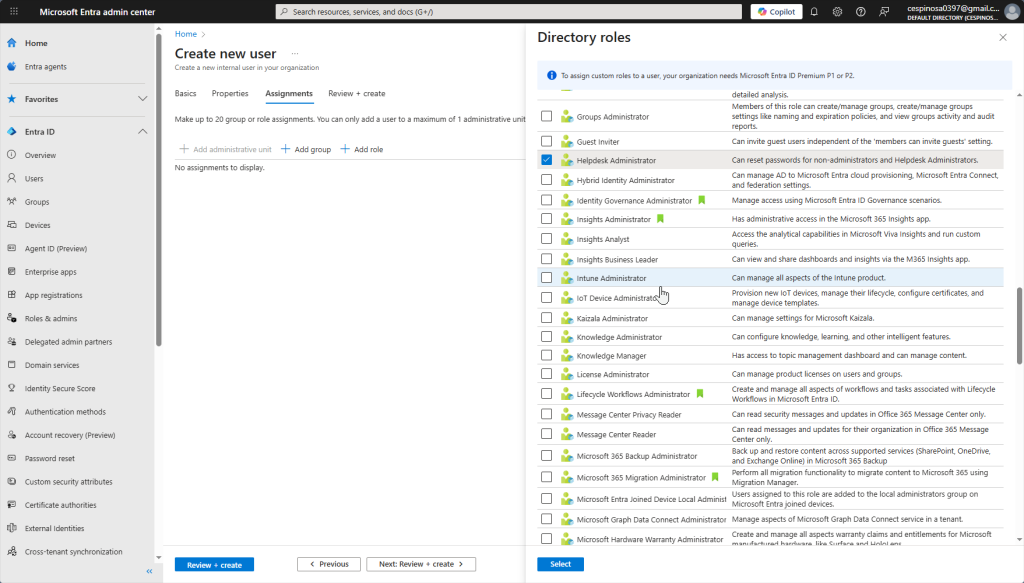
Here you assign the role you want this user to have. We want them to have all the capabilities of a Helpdesk Technician but nothing more – implementing the principle of least privilege. As such, we’re giving this user the ‘Helpdesk Administrator’ role, allowing them to reset passwords and manage basic account issues for non-admin users.
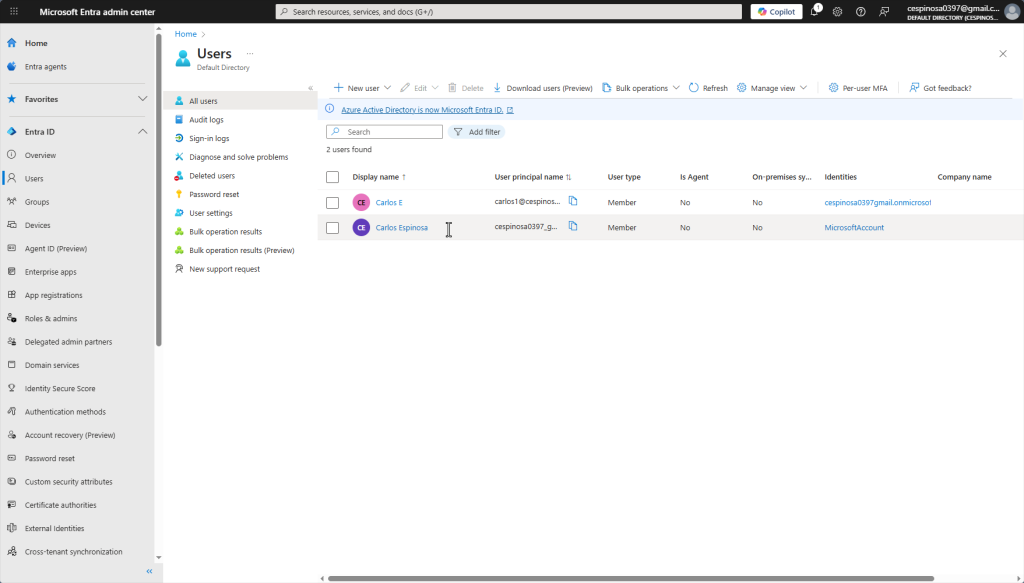
This is the Users tab. From here I can reset passwords, view deleted users, adjust user settings, review sign-in logs and much more – all from one centralized location.
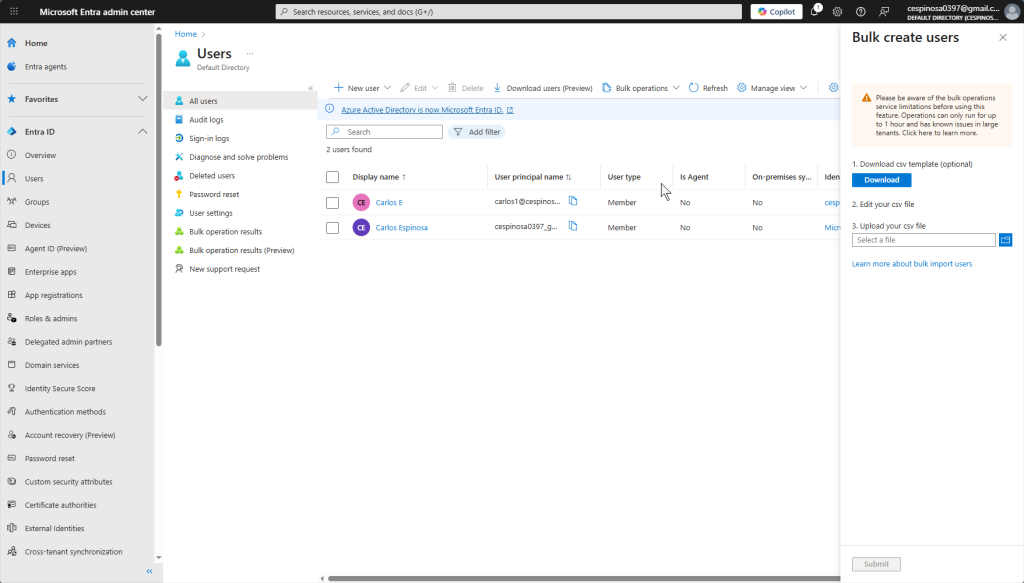
This shows the bulk user creation option we discussed earlier. Using Microsoft’s CSV template, you can create multiple users at once instead of filling out the form individually for each one. (ss this file).

This is the Groups tab. Groups are vital for organizing users based on their department, role, or access needs! This allows you to assign permission and policies once instead of managing each user individually. Instead of applying permissions per user, you apply them per group. New helpdesk hire? Add them to the Helpdesk group and they instantly inherit the same permissions as everyone else on the team. No manual permission assignments, no human error – everything stays clean and organized.
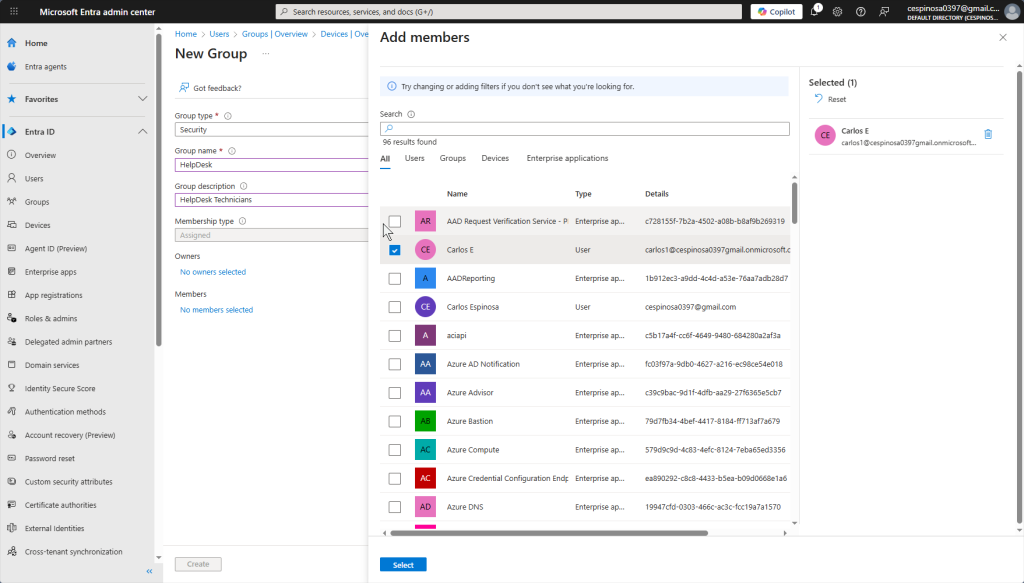
The form to create a new group. Here you add the users you want to join this group.
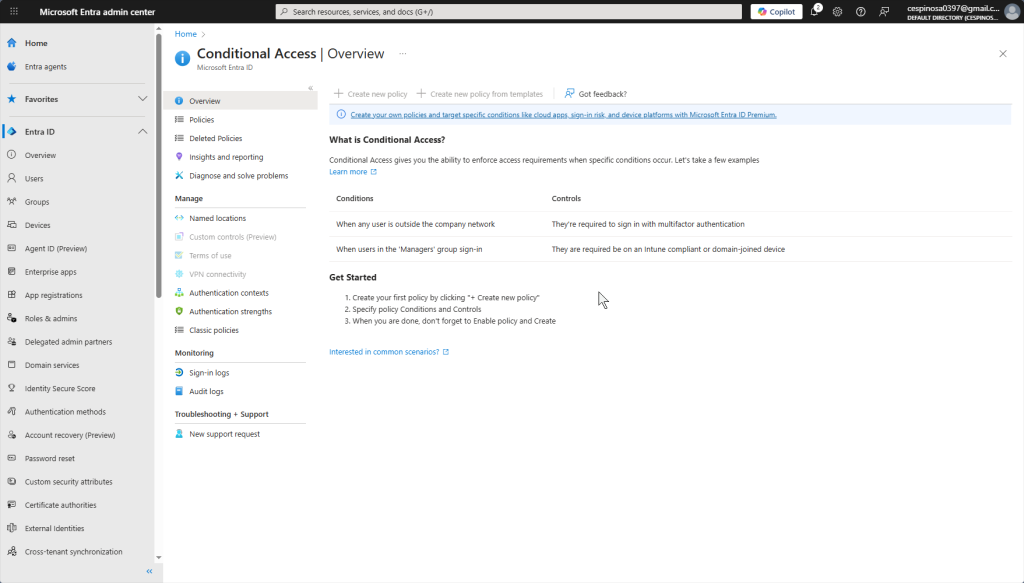
This is one of the most powerful features of Entra ID: Conditional Access. Think of it as the equivalent of creating GPOs for security on an on-prem AD server but more dynamic. With Conditional Access, we can create policies like blocking sign-ins from outside the U.S. for helpdesk users, or requiring MFA for anyone in the Admin group. Access decisions are made real in real-time based on the conditions we define.

We’re trying the one month free trial to be able to fully access Intune and Conditional Access Policies. I assigned this license to both of my users.
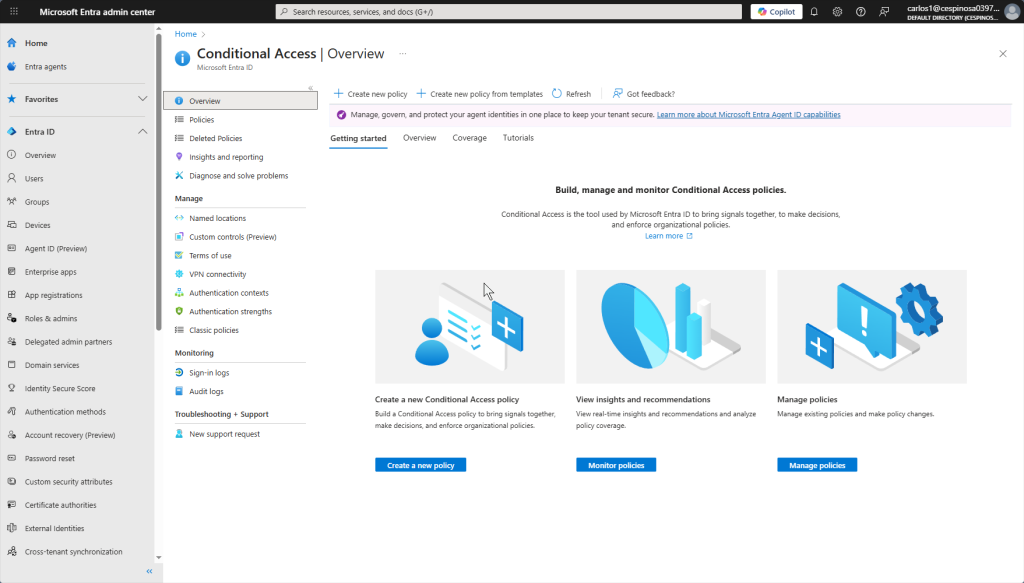
This is the Conditional Access dashboard where you can create, monitor, and manage policies. This essentially replaces the security-focused GPOs we configured on prior on-prem AD projects – but with more flexibility since policies evaluate conditions in real-time based on user, location, device, and risk level.

You can create policies from pre-built templates that the portal provides. We’ll be using the GUI since that’s what most admins use this but you can also automate policy deployment using scripts or JSON files (text-based configuration files). However, I want to showcase creating a new policy from scratch so we’ll skip the templates.
Here are all the components of a Conditional Access policy. Let’s walk through each one. The goal is to create a policy where even if an admin’s device or credentials are compromised, MFA safeguards their account by providing an additional layer of protection.

Here we name the policy and select which users or groups it will apply to.
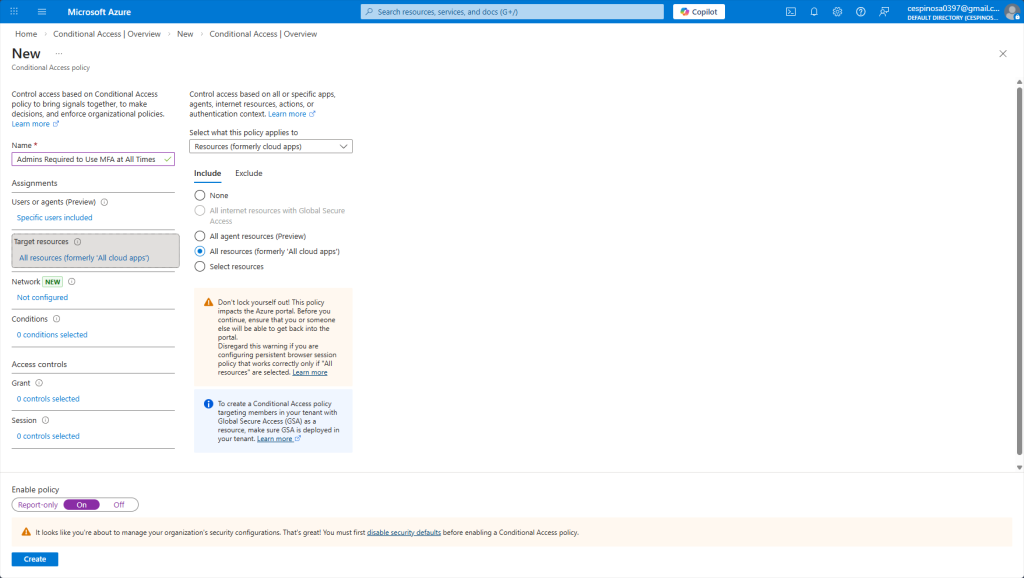
Here I am specifying that this policy applies to every resource the admin would sign into. Notice the warning: Azure is reminding us to ensure we still have a way to access the tenant so we don’t completely lock ourselves out. Sometimes, you may have an emergency account that is excluded form all Conditional Access policies which has its credentials stored somewhere securely offline and ONLY used as a last resort.
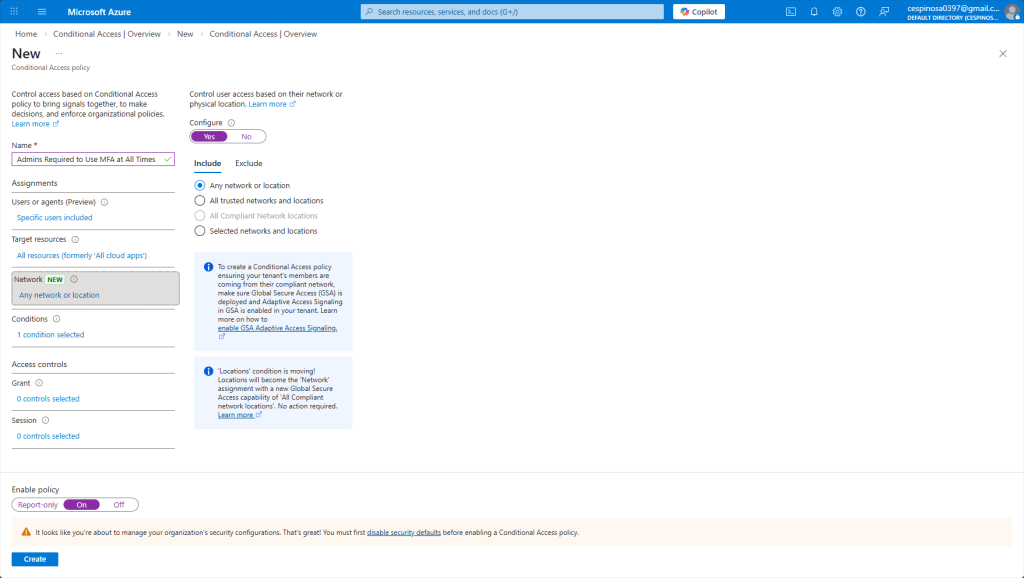
Here I’m configuring the policy to apply regardless of network location – whether the admin is on a trusted corporate network or an untrusted one, MFA is still required.
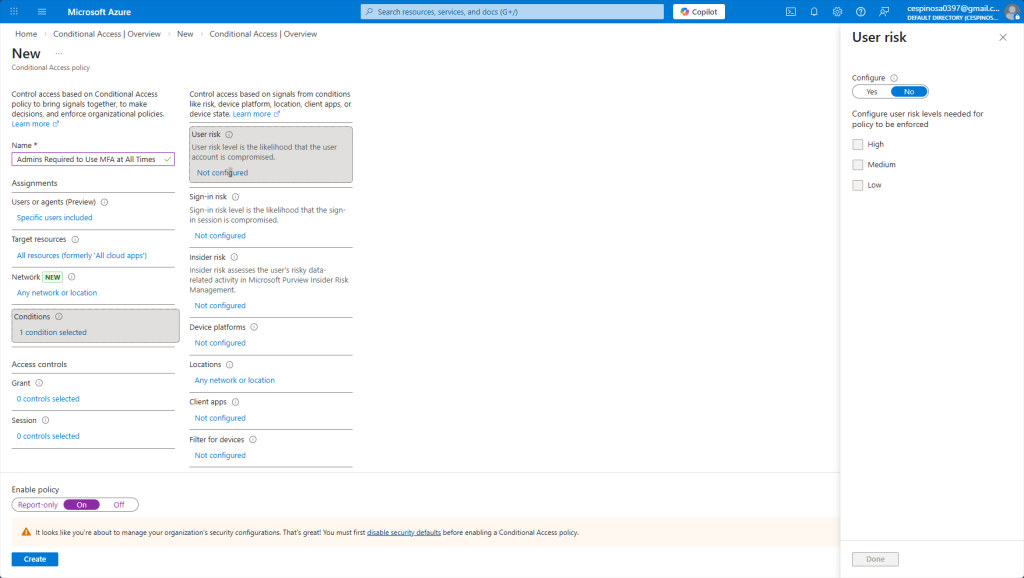
These are additional conditions you can configure to achieve even more granular control – factors such as user risk, sign-in risk, device platform, location, and more. Azure actually monitors user behavior in the background at all times and compares it to their normal patterns (like a user downloading 20GB of data instead of their usual 5GB), and with this data, Azure learns from patterns and can raise their risk level causing your policy to react accordingly. Azure independently calculates risk through different factors and categorizes it as: Low, Medium, or High. If you set the policy to be enforced when a user reaches Medium risk through Azure’s calculation, then it is triggered at Medium or higher.
Since we want all admin accounts to prompt for MFA regardless of conditions, we are leaving these untouched. But if you need a policy to only trigger in specific situations, this is where’d you configure it. Evidently, there is a lot more granular control here than using GPOs in an on-prem AD server.
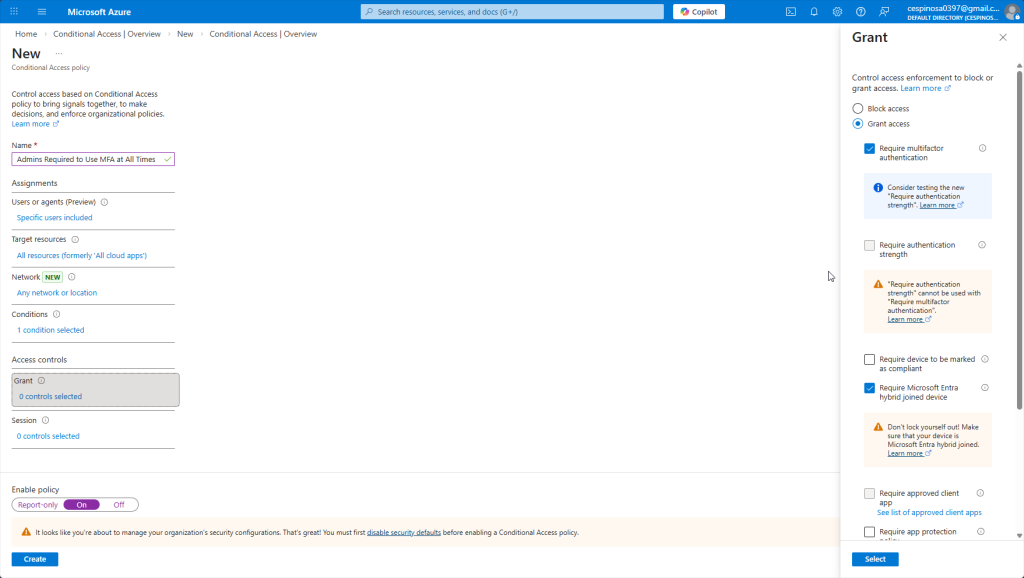
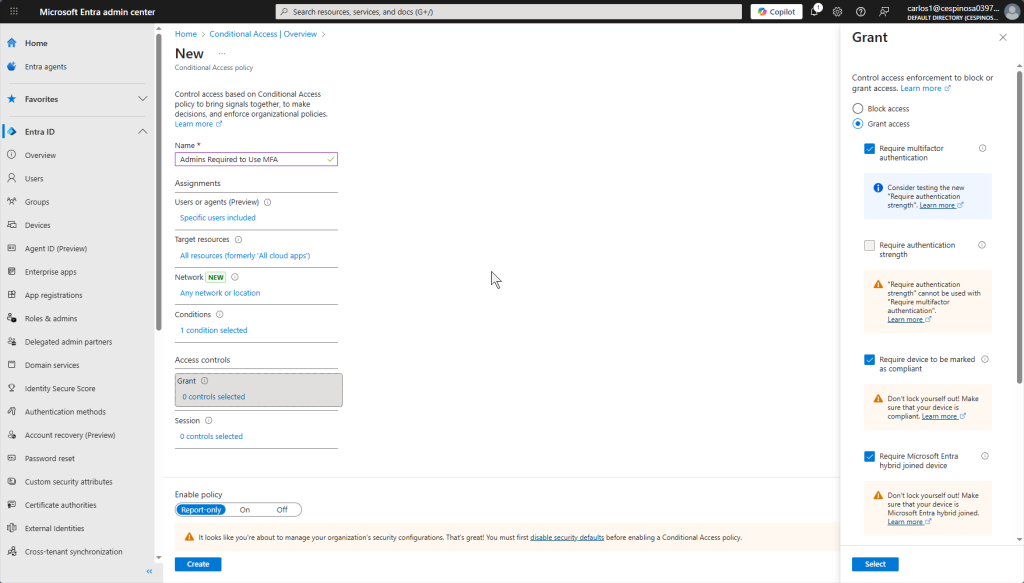
The second to last option you configure for this Conditional Access Policy is whether to grant or block access. When you check the ‘Grant access’ option, if a user triggers any of the conditions or settings we previously configured, they can still be granted access only if they pass the additional requirements we configure here. This can be requiring MFA or having your device marked as compliant. However, if we choose the ‘Block access’ option, the moment a user triggers any of the previous conditions or settings, they will be denied access completely (even if they have MFA or a compliant device). Block offers no second chances. Grant with requirements does.
Since we want our admins to always require MFA regardless, we check ‘Grant access’ and ‘Require MFA’.
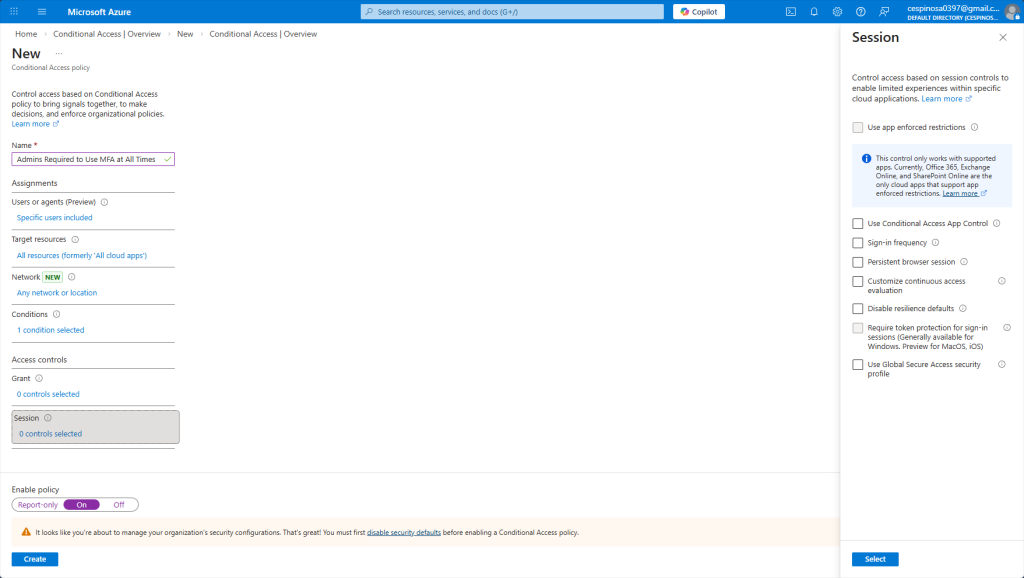
And the final option to fully establish a Conditional Access Policy are the Session controls. These options limit what users can do after they’ve been granted access, regardless if they triggered any conditions or not. This applies to everyone that this policy is enforced to. Some things you can configure here is to force users to re-authenticate after a time period has passed, you can disable the ‘stay signed in’ option on shared devices, or restrict users to only be able to use specific applications. These options are ongoing restrictions.
We are going to leave this untouched for our policy, but if you ever needed even tighter control over active sessions, this is what you’d configure.
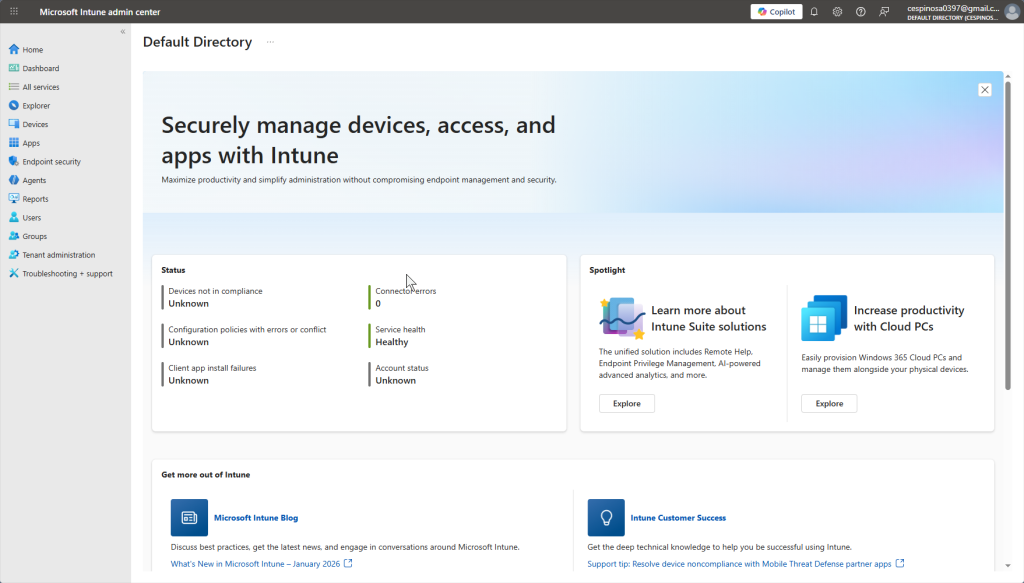
Now we move into Intune. This is the default dashboard when you access this service through Azure. Notice the similarities to ServiceNow – I can see device compliance status, configuration policies with errors, and other key metrics at a glance. You can customize this dashboard slightly but not as flexible as ServiceNow.
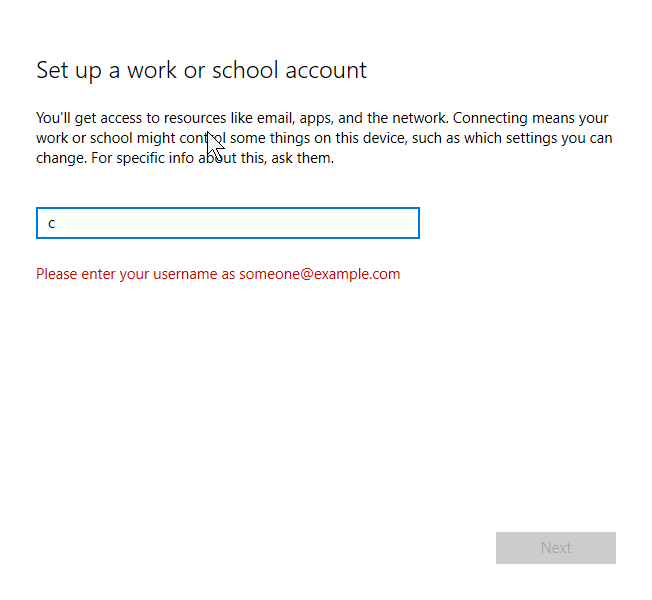
First, let’s enroll my PC into Intune. The way I am doing it is by going to Settings -> Accounts -> Access work or school on the actual device itself. This works for BYOD (Bring Your Own Device) scenarios. There are other ways to do this though: Automatic enrollment when joining a device into Azure AD during initial setup, Group Policies, or even bulk enrollment using a provisioning package file on a USB.
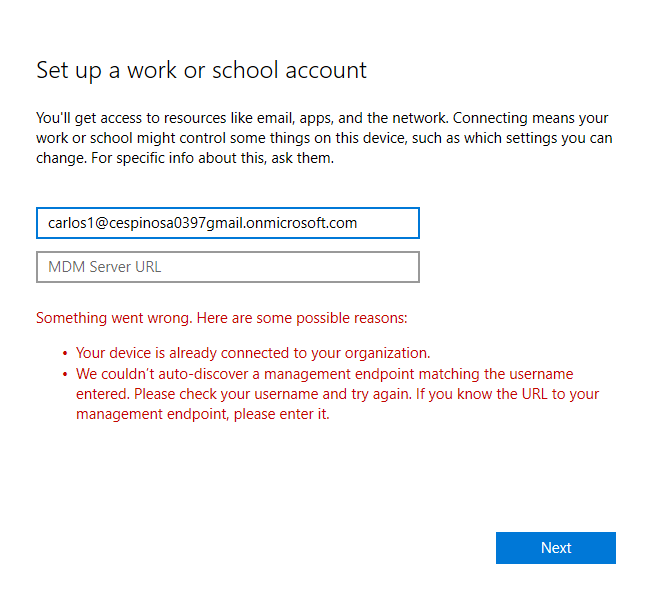
I ran into this issue here: the enrollment kept failing. It turns out that the user account needs an Intune license assigned before enrollment will work. A provisioning package (or the method I used) only tells the device where to enroll – but if that user account does not have a license, the device will not be registered into Intune for that user.
Another thing: You must set up a usage location on the user account before you can assign licenses as shown below. Small detail that is easy to miss but it’ll block you until it’s fixed.
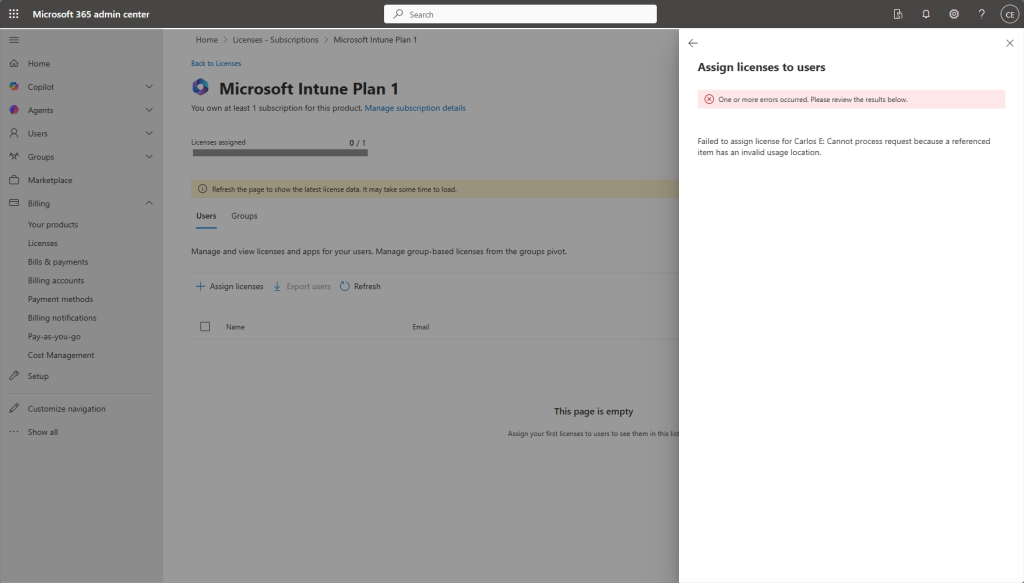
Do not mess this up when creating new users!

Officially connected!

Within the Intune admin center, I can see various metrics and reports. Devices are organized by platform (Windows, Linux , etc.). As you can see, we have my computer which I enrolled into Intune under the Windows platform.
Additionally, note how there are no noncompliant devices, no deployment errors, or any configuration policy assignment failures. That’s expected – we haven’t configured any policies yet, so there’s nothing for devices to fail against.
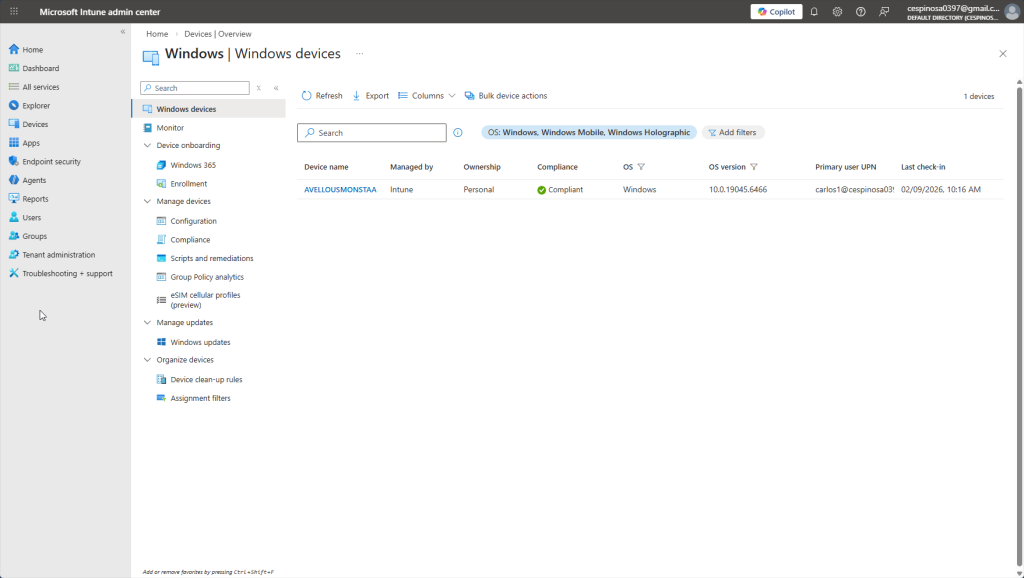
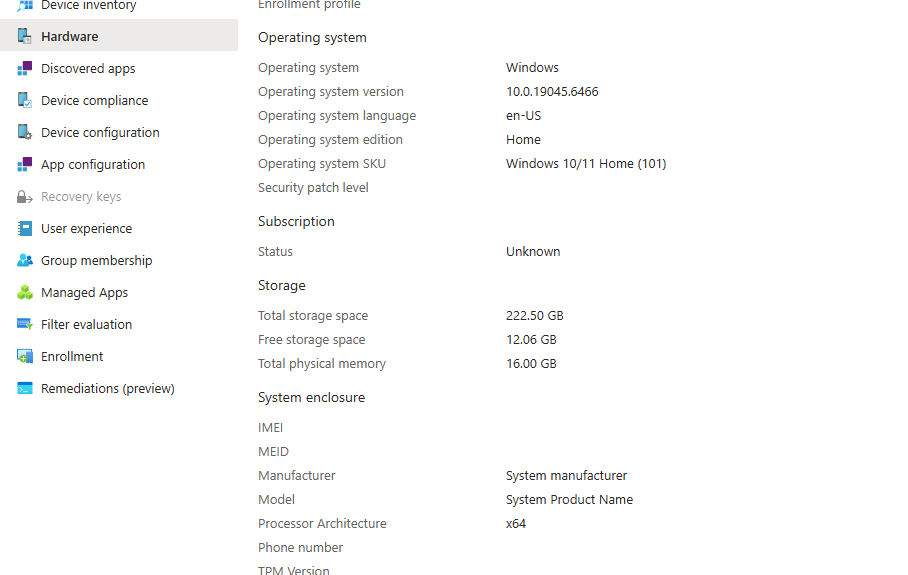
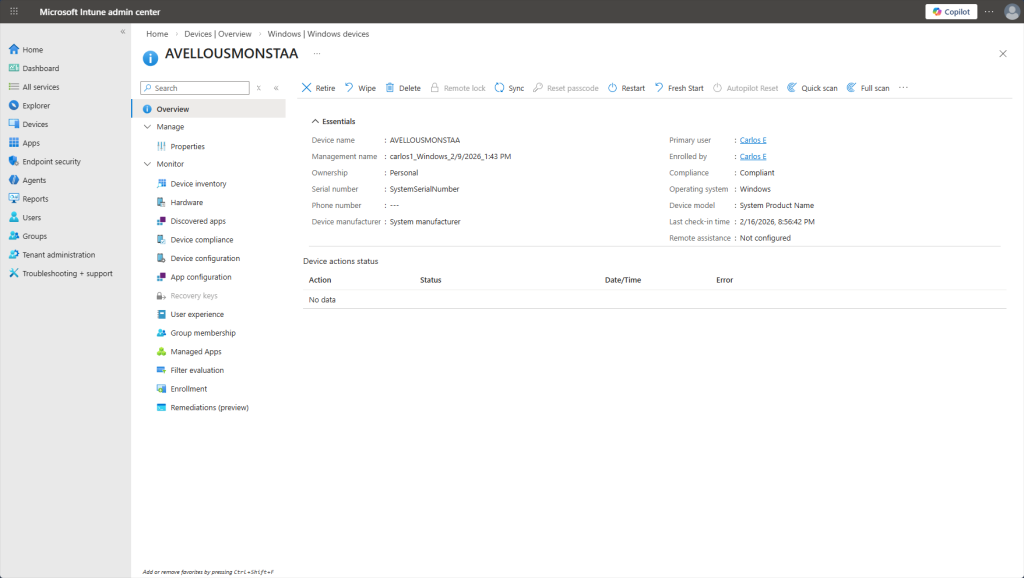
Within the Windows devices section, we can see all of the enrolled Windows devices at a glance: device name, assigned user, compliance status, OS version, last check-in time, and more. Clicking on a device lets me view detailed hardware info, installed apps, and even perform remote actions like restart or wipe.
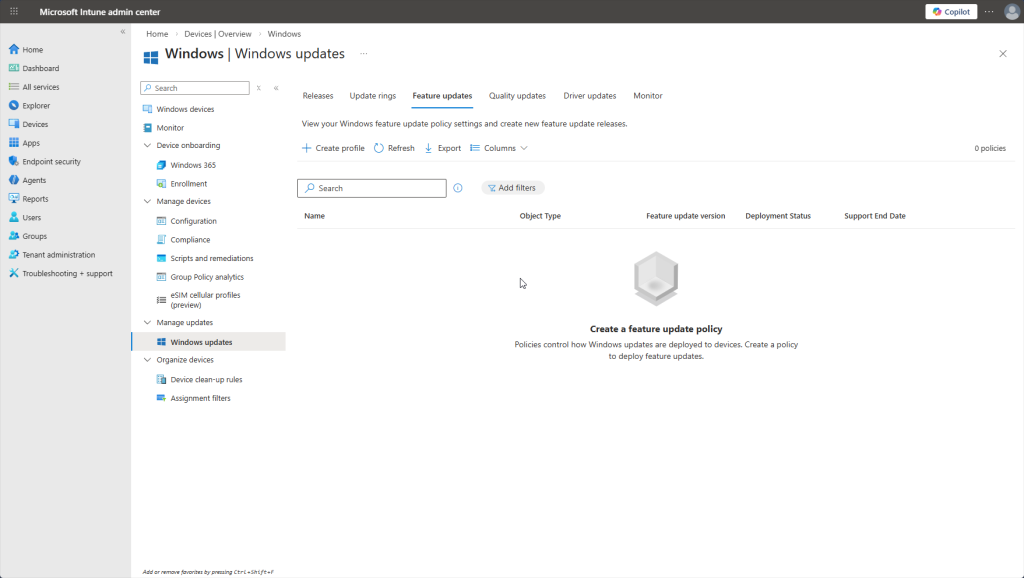
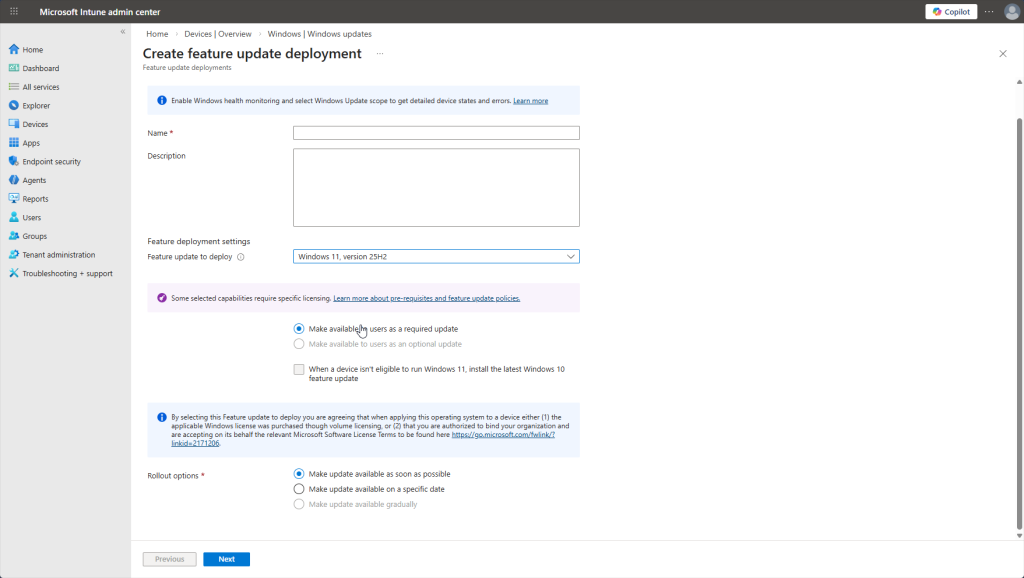
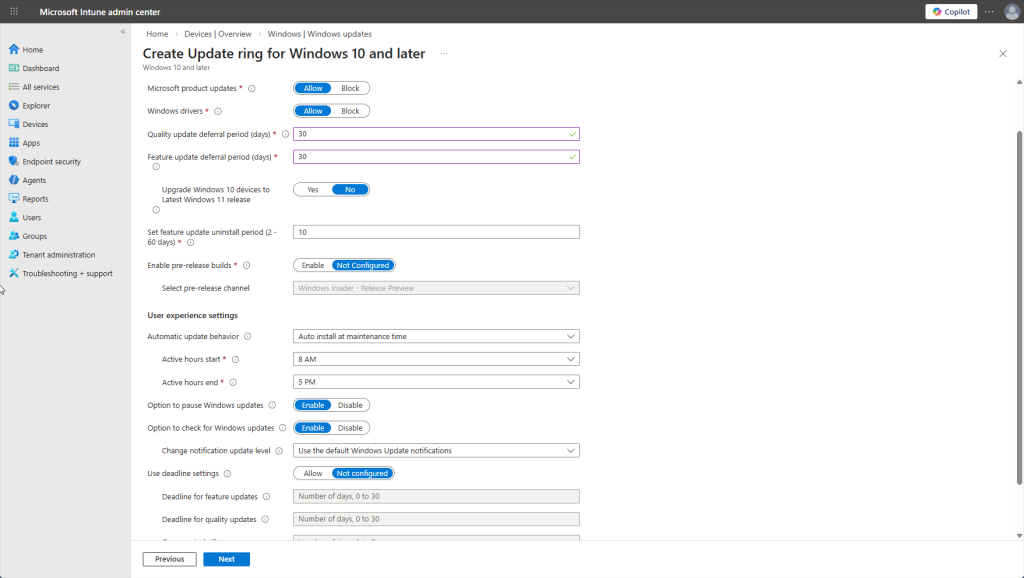
Worth noting: under “Manage updates” in the sidebar, Intune gives you centralized control over Windows Updates. You can create “update rings” to control when updates are deployed like deferring certain updates for 30 days so you do not have to deal with a buggy release and wait for patches. You can also expedite critical security patches, push specific Windows versions to devices, and even pause updates if a bad patch is causing issues. No more relying on end users to click “Update and Restart.”
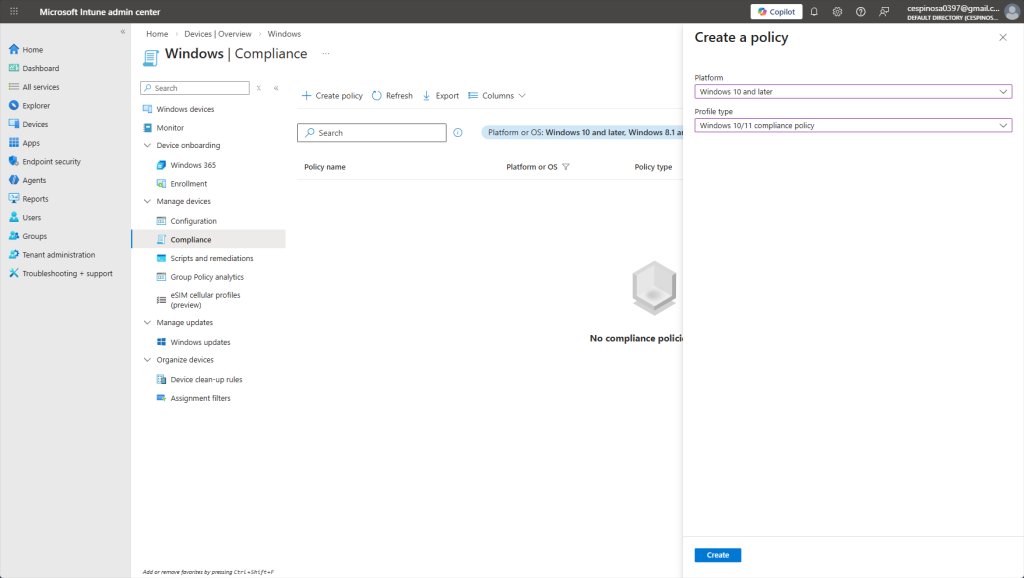
Now we’ll navigate to Compliance to start creating compliance policies for our devices.

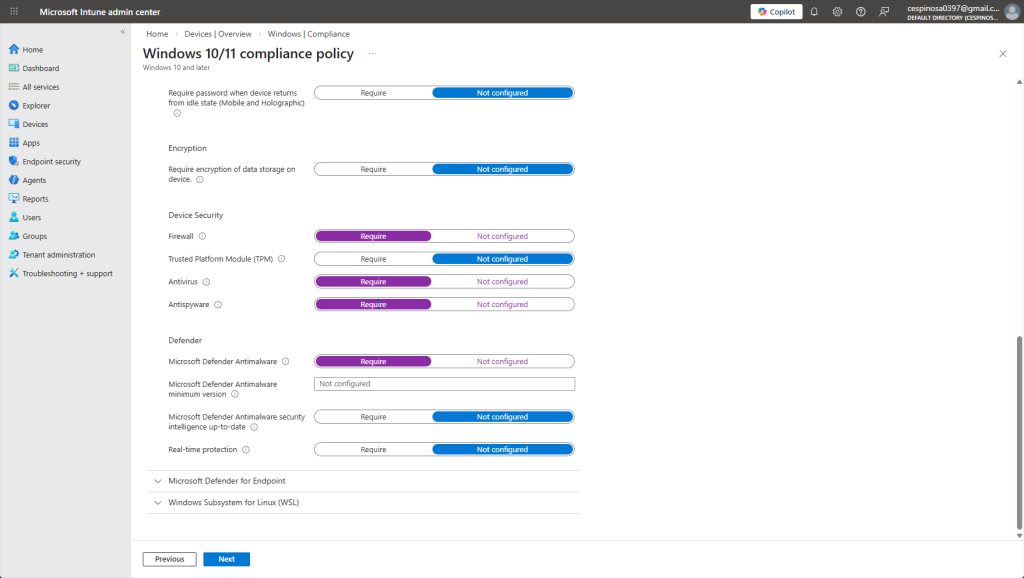
Here are some of the compliance settings you can enforce on enrolled devices. You can require BitLocker encryption, mandate firewall and antivirus, enforce password complexity, and even set a minimum OS version as well as much more.
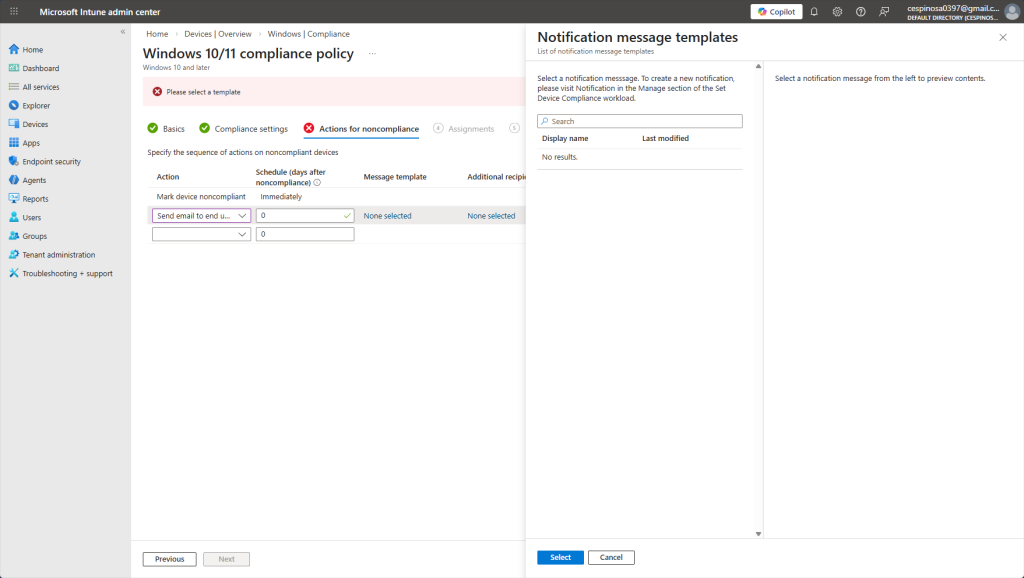
Here, you can configure what happens when a device fails compliance. Intune allows you to define actions for noncompliance such as marking the device noncompliant immediately or sending an email notification to the end user. In fact, I would even be able to set a schedule such as marking the device noncompliant after 3 days of failing.
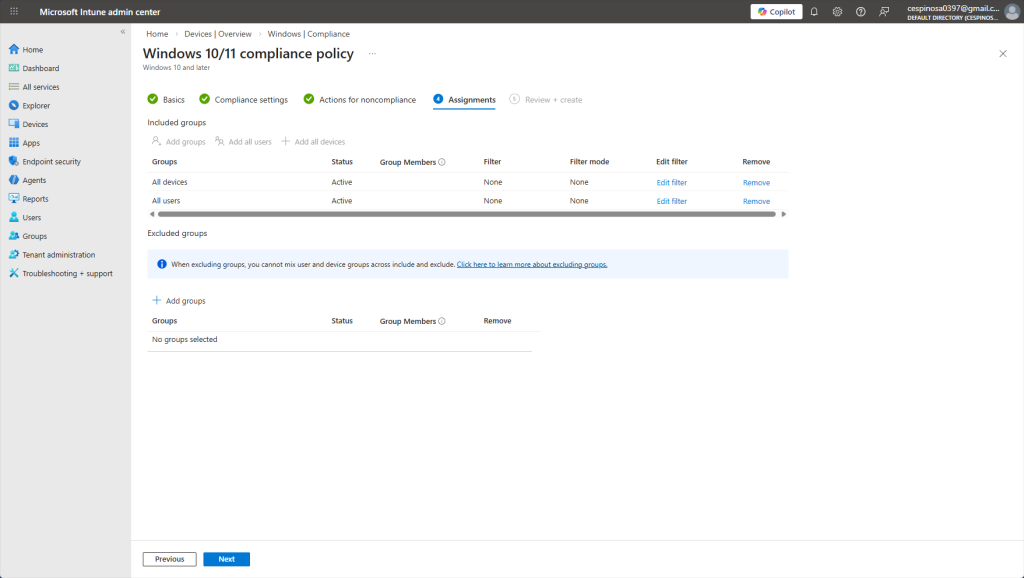
In this part of creating a Compliance Policy, we can assign the policy to groups or users. Since this is a baseline security policy requiring a firewall and basic protections, we’re going to assign it to all users as every single enrolled device should meet these standards.
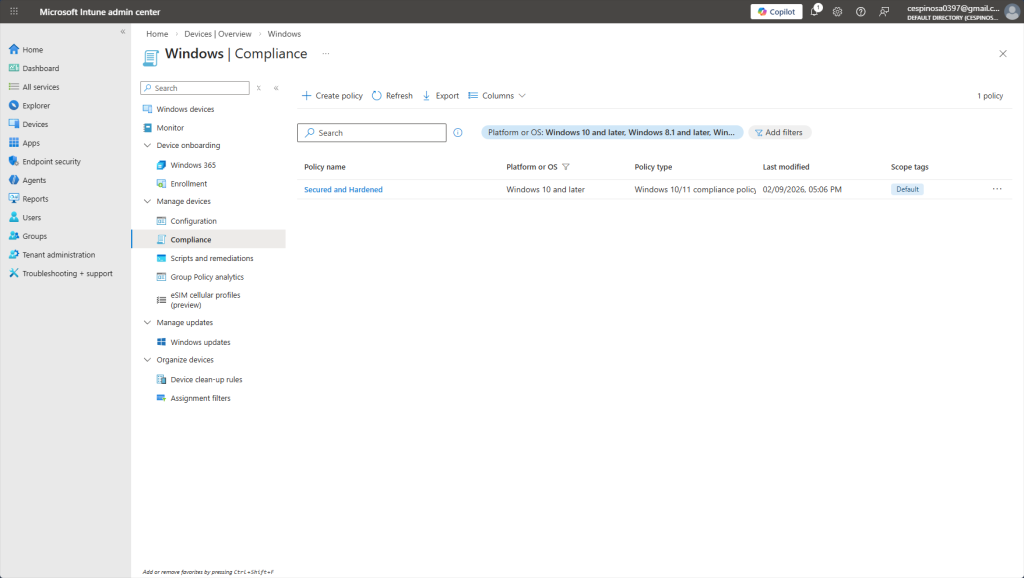
Here, you can see the newly created Compliance Policy under the Windows platform, ready to evaluate devices on their next check-in.
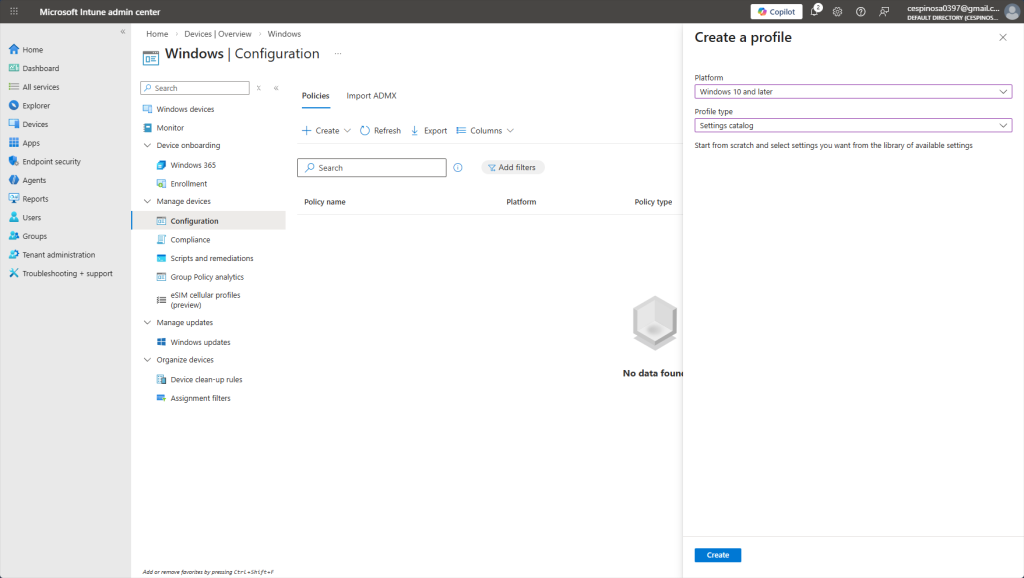
Now we’re going to create a Configuration Profile – another key feature of Intune that lets you push configurations to hundreds or thousands of devices simultaneously.
The difference between a Configuration Profile and a Compliance Policy is that the Compliance Policy only checks whether a device meets your standards and marks it as pass or fail. A Configuration Profile actually enforces the settings – it makes the change for you. Here is the perfect example: Compliance asks if the firewall is on while Configuration says to turn the firewall on.
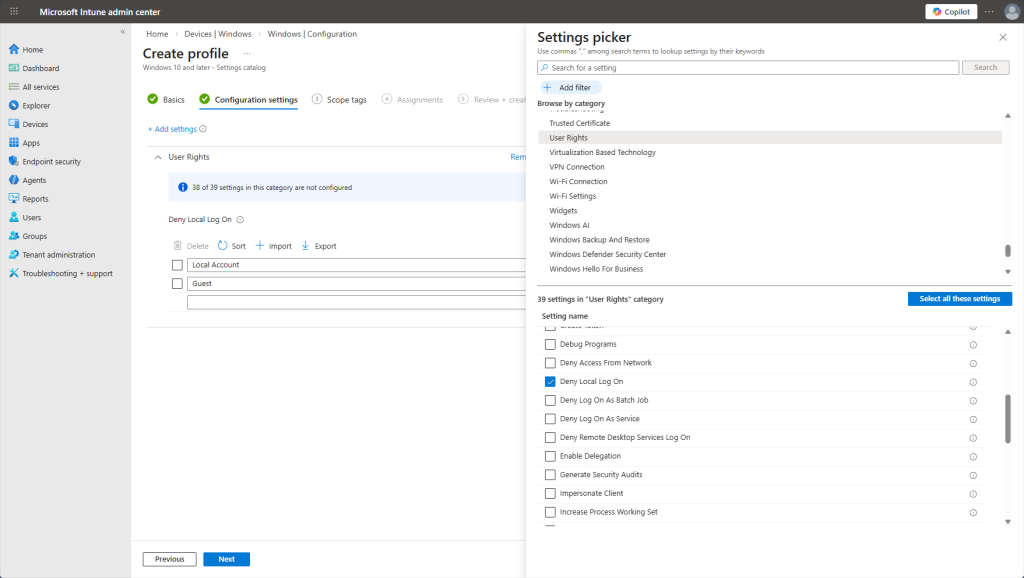
Notice the abundance of options and settings you can configure just for the ‘User Rights’ category. We’re going with ‘Deny Local Log On’ to ensure that the user only authenticates through Entra ID or on-prem AD and not be able to use a local account to bypass policies. Also specified ‘Local Account’ and ‘Guest’ as the denied identities.
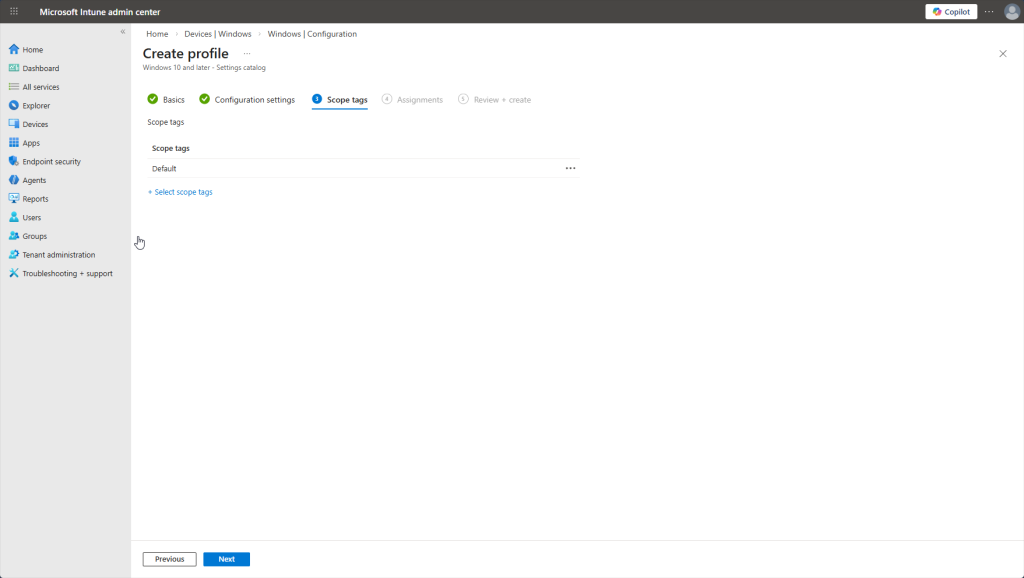
The next step in completing this Configuration Profile is to add a ‘scope tag’. After research, this section is for enterprises with users/devices that span multiple geographies. Scopes are used to tag policies and devices with a designated region. Therefore, admins in Europe won’t be able to see policies that are tagged with a U.S. scope! Not necessary for us here.
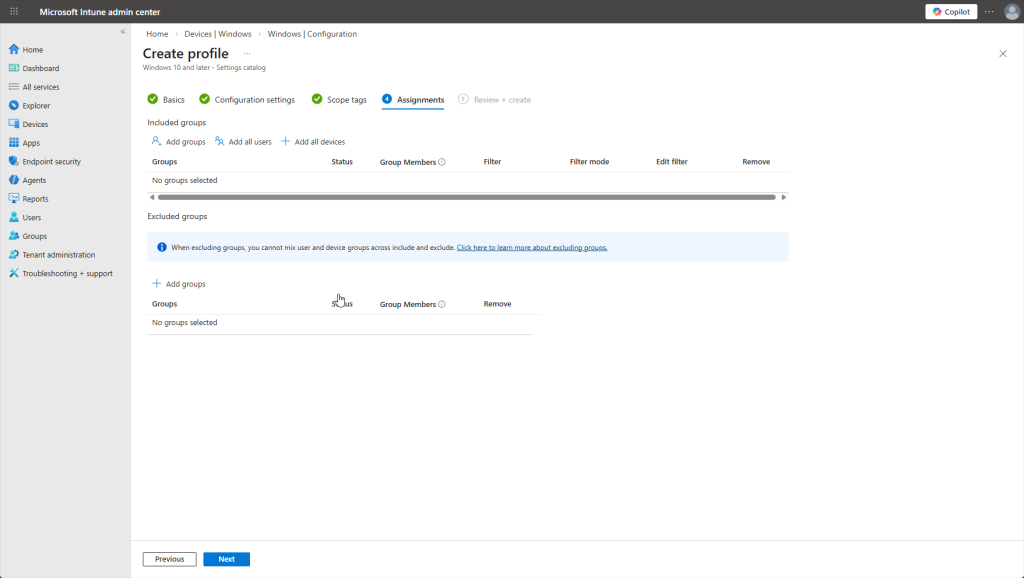
Of course, we always have to assign this policy to users, groups, or devices. We’re going to apply this to all users/devices but excluding the Admin group. Note this is a tradeoff in security because admins may need local logon for emergency troubleshooting if cloud services are not available. There are different methods to circumvent this situation however.
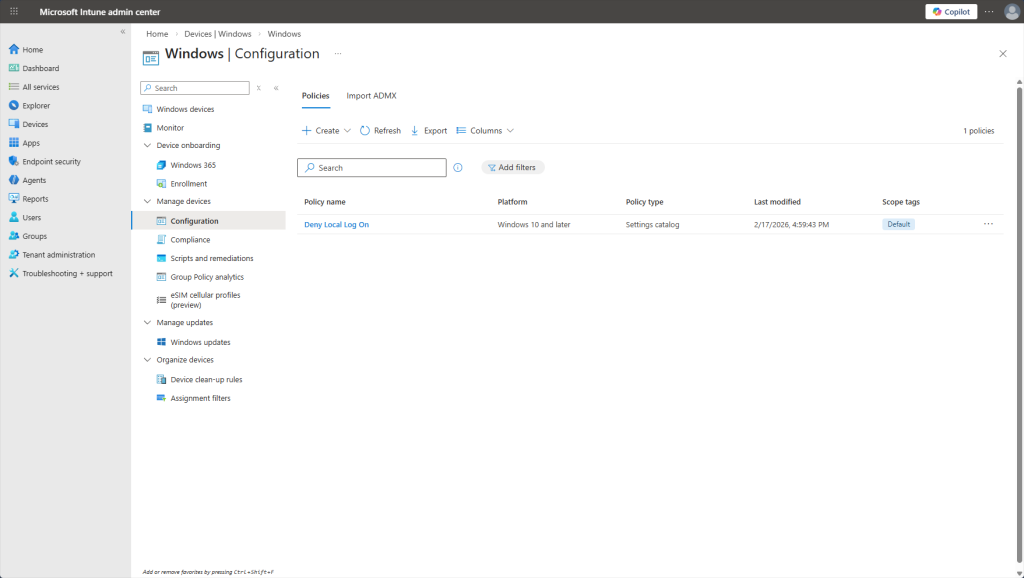
And here’s the Configuration Profile active and ready to be applied to all users on their next sync.
This project gave me hands-on experience with Microsoft’s modern identity and endpoint management stack. Entra ID completely simplified what we did on our on-prem Active Directory servers – no more DNS headaches or domain controller maintenance. Intune lets us manage devices from anywhere without requiring VPN or physical access. Together, they reduce infrastructure overhead and improve security posture. Now, I am confident I can work with these tools in any environment.